Note
Our tool allows you to export all your tours individually or simultaneously in different formats.
Exports via printouts, spreadsheets, and GPX / KML tracks (for GPS models connected by cable) are always available. If you have a mobility partner configured, its export options appear in the drop-down menu. Each vehicle must be linked to the corresponding mobility device Fig. 1.208.

Fig. 1.208 Export Routes.
 Reverse order of stops: allows easy creation of loading lists, for example.
 Send to TomTom as waypoints: sends all stops in a tour to the associated TomTom device, as a single TomTom order passing in front of each stop.
Send to TomTom as Orders*: sends all stops of a route to the associated TomTom device, in the form of multiple TomTom orders.
Clear TomTom*: clears previous routes from your TomTom GPS device*.
 Print: allows you to print your routes in the form of road maps to give to your drivers.
 Spreadsheet CSV / Excel: allows you to export your route in a spreadsheet.
GPX Route: list of way points, sent to the GPS device of your vehicle in GPX format; your GPS can calculate your route.
GPX Track: exact track of the route to take, proposed by our application, sent to the GPS of your vehicle in GPX format.
KML Track: ditto, in KML format.
 KML Track by email: ditto, sent to the email address registered for the vehicle doing the route.
 iCal calendar: provides a download link for the .ics file. You can also copy this link via “right-click” > “copy link address”.
iCal calendar by email: sends .ics files to email addresses that have been entered for vehicles.
TomTom*: or other mobility partner, with these features available.
The date of the last data transmission is also shown.

Fig. 1.209 Date of last transmission of GPS data.
When you click on the CSV/Excel Spreadsheet link, a modal window opens.

Fig. 1.210 Export window for spreadsheet
All the information in a plan can be exported. Sorted into three groups, all information is exported by default.
“Extra stops” can be unplanned destinations, departure and arrival stores, rest breaks and unchecked stops. “Columns” are the information contained in the routes. If information is not needed in the export, you can drag-and-drop it in the “Skip” box. If you click and hold on the information then slide it across to the gray “Skip” area, that column is removed from the export. See the explanatory video. The spreadsheet format is CSV (Comma Separated Value) format for a standard or Excel spreadsheet program.
Note
To open a CSV file with Excel, please see the explanatory sheet.
Click on the  button to download the CSV file. It is stored on the PC in the Downloads folder.
After getting your logins from Notico Deliv’, you have to go to “Global settings” page to save them.
These logins allow our application to send route plans and all necessary information to the Notico server. Fig. 1.211

Fig. 1.211 Export plan settings to Notico
In the Notico Deliv interface, in the “Configuration” menu then “Delivery drivers”, you have to create or identify the delivery driver ID Fig. 1.212

Fig. 1.212 Notico interface
In the Notico Deliv interface, in the “Configuration” menu then “Delivery drivers”, you have to create or identify the delivery driver ID Fig. 1.212

Fig. 1.213 Notico vehicle id
Once this information is saved, for each vehicle it is now possible to send a route directly to Notico Deliv ‘. On the displaying routes page, just click on the routes export icon and then click on “Send to Notico Deliv” :numref: app-plans-export_notico_plan

Fig. 1.214 Export a plan to Notico
You can now find your routes in Notico Deliv:
After getting your logins from Praxedo, you have to go to the Praxedo site to configure some data beforehand.
At least one tag must be defined for interventions (otherwise Praxedo doesn’t take this stop into account) and respect the format: “praxedo:CODE_TYPE_INTERVENTION” (CODE_TYPE_INTERVENTION must exist in Praxedo). Example below « praxedo:LIV »
A “START” and a “STOP” tag must be created for the departure and arrival stores.

Fig. 1.215 Praxedo interventions
In the Praxedo interface, in the “Setup” menu, then Equipment type, you need to create or identify the code for the equipment type.
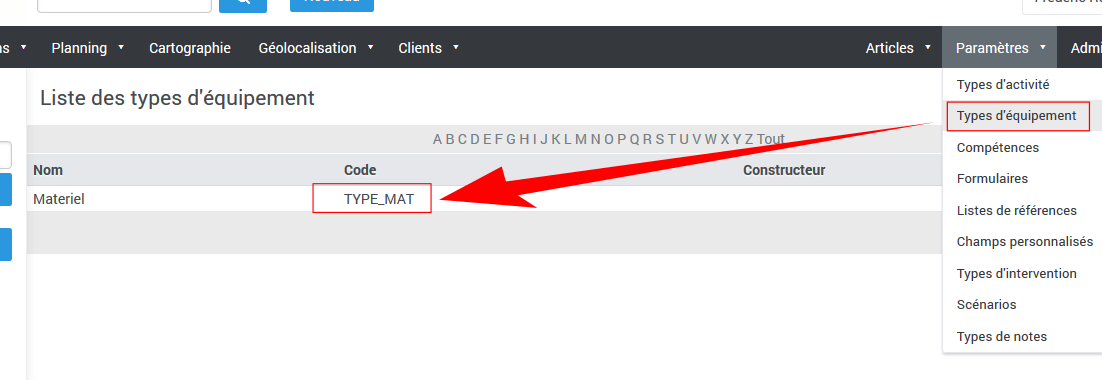
Fig. 1.216 Praxedo material
In the Praxedo interface, in the “Administration” menu then “Technician”, you need to create or identify the ID for each technician, and the synchronization ID, needed for the mobile application.

Fig. 1.217 Praxedo technician ID
Les conditions suivantes doivent être remplies pour que les données transmises par Mapotempo soient interprétables par Praxedo : - Le mode multi-visite doit être activé (option activable sur demande) - Dans la page « Paramétrage global », il faut enregistrer vos identifiants Praxedo. Ces identifiants permettent à notre application d’envoyer les plans de tournées et toutes les informations nécessaires sur le serveur Praxedo. Fig. 1.218

Fig. 1.218 Praxedo vehicle setting
For each route to be sent to each of the vehicles in question, go to the “vehicle configuration” page in our application and save the unique ID for the vehicle corresponding to the “technician code” in Praxedo. Fig. 1.219

Fig. 1.219 Vehicle’s Praxedo Technician code
For each visit:
A reference on the destination can be defined (to be completed when importing). It will be sent to Praxedo to identify the equipment name (equipmentName)
A quantity must be associated to the visit (to be picked up by Mapotempo). Sending to Praxedo, if the quantity exists on Mapotempo side for the route in question, it is updated.
A reference can be defined. It will be sent to Praxedo along with the “Code of material to be delivered”
Then, once that information is saved, for each vehicle, a route can be sent to Praxedo directly. On the routes display page, just click on the routes export icon and then click on “Send to Praxedo” :numref: app-plans-export_praxedo_plan

Fig. 1.220 Export plan to Praxedo
You now can get your routes in the Praxedo web application, and transfer each route to your technicians’ mobile devices. Fig. 1.221
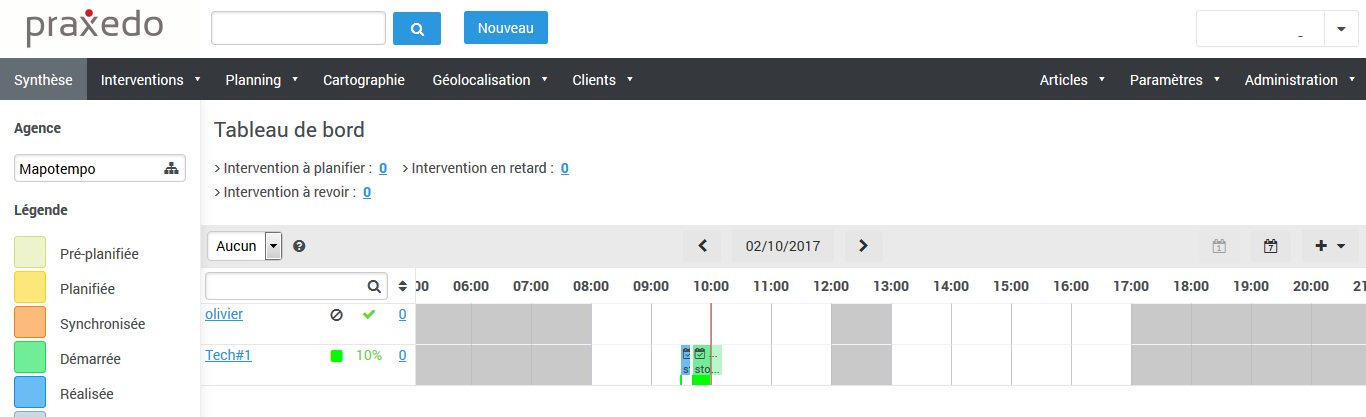
Fig. 1.221 Praxedo home page
Via the tool, you can send the plan routes to a mobile to schedule them on your calendar and use them on a mobile GPS navigation application called Waze.
Prerequisites: you will need to install the Waze app from Play Store.
Activate geolocation on your phone via the task bar Fig. 1.222.

Fig. 1.222 Enable geolocation.
Launch the Waze application. Press the “Next” button Fig. 1.223.

Fig. 1.223 Launch the Waze application.
Slide your finger from the bottom up and click the “Accept” button Fig. 1.224

Fig. 1.224 Accept the license.
The application home screen appears Fig. 1.225.

Fig. 1.225 Home.
Press the magnifier icon in Waze to bring up the application menu Fig. 1.226.

Fig. 1.226 Menu.
In the menu, press “Planned drives” Fig. 1.227.

Fig. 1.227 Planned drives.
Press “Synch Calendar events” to start synchronization between Waze and the calendar Fig. 1.228.

Fig. 1.228 Synch Calendar events.
Exit the Waze application.
The file in iCal format will allow you to import your tour into your mobile’s calendar, then to the Waze GPS.
On the Plan tab, select the Plan from the drop-down menu containing the route to be sent Fig. 1.229.

Fig. 1.229 Access the routes plan.
The “Edit plan” screen appears. Click the  icon.
icon.
From the drop-down menu, select “Calendar iCal by E-Mail” Fig. 1.230.

Fig. 1.230 Sending the iCal calendar by email.
The route is sent by e-mail to the address entered in the vehicle settings. (See the vehicle configuration). A confirmation message is displayed at the top right of the interactive map Fig. 1.231.

Fig. 1.231 iCal file sent successfully.
On the smartphone, you receive an email in the following form: Fig. 1.232.

Fig. 1.232 E-mail received with link to the iCal file.
Note
Emails can sometimes end up in junk or spam email folders.
Click on the framed link, the smartphone offers to open the file with the browser of your choice Fig. 1.233.

Fig. 1.233 Choose a browser to start downloading the file.
Select the desired browser icon; the browser window opens and then the download starts Fig. 1.234.

Fig. 1.234 Downloading.
Once the download is complete, check the notification bar (swipe your finger from the top to the bottom of the screen to bring up the notification bar). The downloaded iCal will be visible Fig. 1.235.

Fig. 1.235 File download reported in notification bar.
Tap the iCal file in the notification bar.
Depending on the Android mobile, there are different calendar apps to exploit the iCal file data.
The mobile will offer you to import or save the iCal data in S Planner (the default Samsung Android calendar). Tap the “Save” or “Import” button depending on the Android version Fig. 1.236.

Fig. 1.236 Import the iCal data into S Planner.
Note
When first used, you are asked to allow the S Planner application to access the files on your device, tap “AUTHORIZE”.
Customers are imported into the S Planner calendar Fig. 1.237.

Fig. 1.237 Destinations imported into S Planner.
The route is displayed in S Planner on the date of the plan in Mapotempo. Go to S Planner to view the route.
In the calendar, tap the date of the route you are interested in Fig. 1.238.

Fig. 1.238 Select the desired route date.
A window appears with the route, and then tap the first point of the route Fig. 1.239.

Fig. 1.239 Tap the first point of the tour.
In the form for the first point on the route, tap the point’s address in the “Location” field. It is suggested that you open the file with the Waze application. Select “Open file with Waze” or tap the Waze icon. (Choose “once” or “always” depending on your needs). Fig. 1.240.

Fig. 1.240 Open the file with Waze.
The address opens in Waze. Tap the first address shown. Fig. 1.241.

Fig. 1.241 Select the first address shown.
The form for that waypoint is displayed. Click the “Go now” button Fig. 1.242.

Fig. 1.242 Start the navigation.
Navigation starts.
Have a good trip
When you click on the export icon, select Send to Mapotempo Live mobile app.
The modal window for route export to Mapotempo Live opens.

Fig. 1.243 Export to Mapotempo Live modal window.
Over four columns, vehicles can be linked to a date and a Mapotempo Live user. Opposite the route / vehicle name, select a date from the calendar. Then select a user from the drop-down menu on the far right.
Only routes whose checkboxes are checked are sent to Mapotempo Live.
A warning message alerts you to any possible inconsistency. In this example, two routes are being sent to the same cellphone.
Reports are CSV (comma-separated values) format files for routes sent to Mapotempo Live over a specific period, which you select at the time of extraction. They include points visited, status change history, and links to information gathered on routes.
In the general Mapotempo Web menu, the Reports tab opens the page where route reports can be downloaded.

Fig. 1.244 Reportings form.
The form contains the following fields. 1. Begin date and End date: a calendar appears when you click on the field. Select the dates on which you want the report to start and end. 2. History of status: if the box is checked, the report lists status changes applied on the route, their date and their GPS coordinates. Status descriptions can be customized but, by default, they are “to do”, “in progress”, “done” and “not done”. 3. The Download button: When you click on , the Report is downloaded to your computer’s Downloads folder, or another folder chosen by you.
Go to the file where the report was downloaded, and double-click on the report.
To open the reporting with Excel, open Excel.

Fig. 1.245 Excel Datas.
Click on the Data tab (1). The “Get & Transform Data” section on the left (2) can be used to select “From Text/CSV” (3). Fig. 1.245

Fig. 1.246 Excel opening window.
In the window that opens, select the downloaded report from the chosen folder. Fig. 1.246 It may be that only Excel files are displayed. In the drop-down menu at the bottom right (1), above the “Import” (2) and “Cancel” buttons, selected “All files”. Click on “Import” (2).
Note
The text import window may differ according to Excel version. The important thing is to select comma as the Delimiter or Separator, and UTF-8 as the File origin. Fig. 1.247

Fig. 1.247 File origin window.
From the choices in the “File origin” drop-down menu (1) select 65001: Unicode (UTF-8). From the choices in the “Delimiter” drop-down menu (2) select Comma Fig. 1.248

Fig. 1.248 Delimiter window.
The actual Report opens.
Note
Opening csv files automatically with excel can corrupt the downloaded csv files and cause data to be shifted into the wrong columns. Depending on your browser and operating system, there are many different ways to prevent these files being opened automatically in Excel.
Each row in the report corresponds to one mission. The information contained in a row all refers to the same mission. Missions are listed in the order in which they were planned.
Columns in the CSV report are broken down into the sections below.
Information about the route is contained in columns A and V (as per example):
route date: Shows the date and time for which the route is scheduled. The format is dd/mm/YYYY HH:mm:ss +*time zone* offset.
username: Shows the route user’s name (name of the vehicle that completed the route).
user email: Shows the route user’s email (email provided for the vehicle that completed the route).
route name: Shows the name of the route (if different than the name of the vehicle).
scheduled date: Shows the date and time for which the mission is scheduled. The format is dd/mm/YYYY HH:mm:ss +*time zone* offset.
ETA date: Shows the date and time on which the mission is completed. The format is dd/mm/YYYY HH:mm:ss +*time zone* offset.
mission type: Shows whether this is the departure or arrival store, a visit or a rest break.
reference: Shows the stable, constant and unique ID enabling this element to be updated without being deleted at the next import.
name: Shows the name of the customer or destination visited.
lat: Shows the destination’s latitude (in decimal degrees) in the range -90° to 90°. E.g. 45.91.
lng: Shows the destination’s longitude (in decimal degrees) in the range -190° to 180°. E.g. -0.781.
street: Shows the building number, street type and street name (spelling must be correct for reliable geocoding). Note: access details must be put in the “additional” field.
Additional: Gives access details in addition to the street so that the field agent can reach their destination doorstep. E.g. building in a complex, block of flats, staircase, floor, door number etc.
Postal code: Indicates the postal code of the city or locality (precision is important for reliable geocoding).
city: Shows the name of the city or community (spelling must be correct for reliable geocoding).
state: Shows the name of the state (spelling must be correct for reliable geocoding).
country: Shows the name of the country (spelling must be correct for reliable geocoding).
phone: Shows the customer’s contact telephone number.
Comment: Gives information needed for the visit.
(and following) start of time window no.: Shows the start of time slot(s) (can go over 24:00) recommended for the visit.
(and following) end of time window no.: Shows the end of time slot(s) (can go over 24:00) recommended for the visit.
Information gathered during the course of a route is shown in the following columns (in the example, between columns V and AU):
(as per example) duration: Shows the anticipated duration of the visit.
(as per example) final position: Shows the last position shown for the mission.
(as per example) description of all positions: Shows all positions through which the mission has passed.
(as per example) lat all positions: Shows the latitudes of each position shown for a mission.
(as per example) lng all positions: Shows the longitudes of each position shown for a mission.
AA. (as per example) date all positions: Shows the dates of each status shown for a mission. AB. (as per example) comment found: Shows the comment written during the mission. AC. (as per example) lat found: Shows the latitude of the point identified on the map during the mission. AD. (as per example) lng found: Shows the longitude of the point identified on the map during the mission. AE. (as per example) road found: Shows the detail or the new road identified during the mission. AF. (as per example) addition found: Shows additional address information identified during the mission. AG. (as per example) postal code found: Shows the postal code identified during the mission. AH. (as per example) city found: Shows the city identified during the mission. AI. (as per example) state found: Shows the state identified during the mission. AJ. (as per example) country found: Shows the country identified during the mission. AK. (as per example) photos found: Shows the URL (web address) where to find the photos taken during the mission. AL. (as per example) signature found: Shows the URL (web address) for the image of the signature captured during the mission. AM. (as per example) signature name found: Indicates the name of the person who signed. AN. (as per example) tag IDs all temperatures: Shows the ID for the temperatures taken during the mission. AO. (as per example) latest values all temperatures: Shows the last temperature taken at the end of the mission. AP. (as per example) date all temperatures: Shows the date of each temperature reading. AQ. (as per example) units all temperatures: Shows the unit in which the temperature was taken. AR. (as per example) violations all temperatures: Indicates the number of times the temperature overshot. AS. (as per example) link to details all temperatures: Shows the URL for the page containing the temperature readings. AT. (as per example and following) quantity[nameUnitDeliverable]: Shows the quantity of the unit to deliver and, in square brackets, the name of that deliverable unit. AU. (as per example and following) quantity found[nameUnitDeliverable]: Shows the quantity of the unit delivered or collected and, in square brackets, the name of that deliverable unit.
Want to add vehicles to your subscription, request a quote, subscribe to an option? Our sales team will answer you as soon as possible.
or Tel. +33 (0) 5 64 27 04 55
* From Monday to Friday 9 am - 5 pm (Paris time) without interruption
You have suggestions, you want to report a bug, ask for information? Our help desk team will answer you as soon as possible.
ou Tél. 05 64 27 05 83
* From Monday to Friday 9 am - 5 pm (Paris time) without interruption