Global Settings include:
account configuration,
number of vehicles in your fleet,
your vehicle fleet details: the chosen routing engine and options,
output of your routes: media used to communicate route information.
For “Global Settings”, click on the right menu and select “Global Settings” Fig. 1.9.

Fig. 1.9 Global Settings.
The following page is displayed app-global-settings-num-full

Fig. 1.10 Change Global Settings.

Fig. 1.11 Global Settings Account Information
You can view the information related to the contract signed with Mapotempo (1):
Account: your entity name,
End subscription: anniversary date on which your service contract ends.
The drop-down Routing engine menu allows you to choose between:
the fastest or shortest routes,
the different types of vehicle.
The type of vehicle selected represents a fleet composed (mostly or entirely) of heavy goods vehicles, light vehicles, cycles or pedestrians.
The options you can adjust will vary according to your selection.
Note
Each vehicle can be set up using a different routing engine on its vehicle page (see section on Vehicle management).
Business terms can be used to customize Mapotempo Web using the company’s own terminology.
To manage a business term, go to the Global settings page. The Business terms section can be used to add or edit one or more business terms.
The pre-filled value corresponds to the initial term.
Visit
Store
Vehicle
Deliverable unit
Simply fill in the field with the appropriate term. Save the global settings by clicking the button at the bottom of the page. Fig. 1.13

Fig. 1.13 Business terms section
The new name appears in brackets alongside the standard term.
In the menu, for example Fig. 1.14

Fig. 1.14 Business terms section
In the destinations list, for example Fig. 1.15

Fig. 1.15 Business terms section
Despite the huge wealth of data found in Mapotempo, there is a possibility that, depending on your business, some additional fields might be needed; e.g. a cell phone field, visit type etc.
Note
They are sent to Mapotempo Live and can be found on mission sheets.
general administration of a dealer account
the account global settings page, in the Custom fields section.
All creation, editing and deletion is covered in the two levels of information.
To manage a custom field, go to the Global settings page. A Custom fields section can be used to add, edit or delete a custom field. Fig. 1.16

Fig. 1.16 Custom fields section
To create a custom field, go to the Global settings page. Fig. 1.17
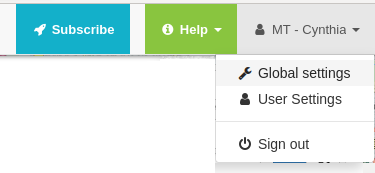
Fig. 1.17 Link to global settings
 . Choose the page or section in the application where the field should appear:
Deliverable unit
Route
Store
Tag
User
Visit
Vehicle
Vehicles configuration
Zoning
Name the new field. You can define a default value and help text so a correct value is entered in the field. For example: Create the pet field, set the default value as Dog and explain: “Enter the name of a pet. ”
Save by clicking on the Update Global settings button  .
.
Note
When the custom field is linked to the Store, Route, Destination or Visit, it appears in the stop popup on the map.
The Custom field appears in a blue box. Fig. 1.18

Fig. 1.18 Custom field in a blue box
Click on the Edit button  to access the custom field sheet.
Make your changes. The section or page to which it is linked cannot be edited.
Save the Global settings by clicking on the Update Global settings button .
You can cancel any changes to a custom field by clicking the Cancel changes button  .
.
You can cancel the creation of a custom field by clicking the Cancel creation button  .
.
Click the Destroy button next to the custom field  .
.
Confirm.
Save the Global settings by clicking on the Update Global settings button .
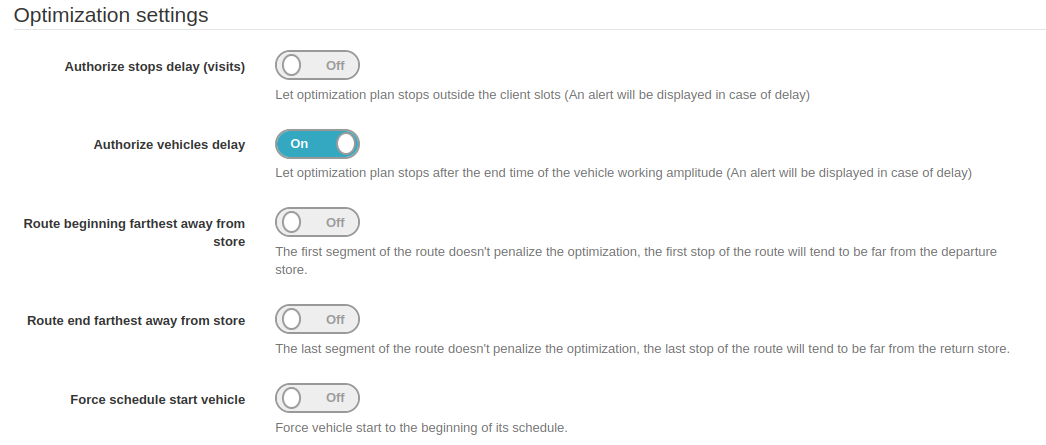
Fig. 1.19 User settings
The buttons to the right of items show whether optimization settings are active (On) or inactive (Off).
Delays at stops or to vehicle returns can be accepted (Off) or respected (On).
It is possible to have the route starting or ending at the point furthest from the store (On) or to leave the optimization process to calculate.
Note
Optimization calculates the best route possible, minimizing costs. Depending on constraints and requirements, optimization may suggest waiting times, delayed starts etc.
The vehicle start time can be forced. This function implies that the vehicle start time (Time amplitude) is respected. Each route leaves at the vehicle start time.
Note
If forced start is active, the map shows the pin icon ![]() to the left of the route start time.
to the left of the route start time.
For the fastest route, the system calculates the fastest possible route in terms of time taken.
When “Heavy goods vehicle” is chosen from the “Routing engine” drop-down menu, options specific to heavy goods vehicles will be displayed. These can all be adjusted, and can be set/modified on each vehicle page (see section on Vehicle management). Fig. 1.20

Fig. 1.20 Set “Heavy Weights - Fastest”
If you select Yes, the calculator includes motorways. If you select No, the calculator ignores motorways.
If you select Yes, the calculator includes toll sections. If you select No, the calculator ignores toll sections.
Set the number of articulated trailers being towed. The number must be between 0 and 4. You can use the arrows to the right of the field, or enter the required number directly.
Set the weight of the vehicle. The weight is of the vehicle including trailers and freight, and is expressed in metric tons. It must be between 0 and 1000 metric tons. You can use the arrows to the right of the field, or enter the required number directly.
Set the weight per axle. The weight per axle is the result of dividing the total weight of the vehicle by the number of axles, and is expressed in metric tons. It must be between 0 and 1000 metric tons. You can use the arrows to the right of the field, or enter the required number directly.
The height of the vehicle is expressed in meters. It must be between 0 and 50 meters. You can use the arrows to the right of the field, or enter the required number directly.
The width of the vehicle is expressed in meters. It must be between 0 and 50 meters. You can use the arrows to the right of the field, or enter the required number directly.
The length of the vehicle is expressed in meters. It must be between 0 and 300 meters. You can use the arrows to the right of the field, or enter the required number directly.
If this is checked, the calculator strictly enforces any exclusions. If it is not checked, exclusions will be ignored if it cannot find another way.
If the speed of xx km/h is not appropriate for your vehicles, you can adjust it. The adjustment is expressed as a percentage; a setting of more than 100% indicates a faster vehicle, and vice versa.
Enter the average time spent at each checkpoint. It will be applied to each Visit, but it can be adjusted for each individual Destination. The format is hours:minutes:seconds.
Default country
When this box is checked, the “State” field is shown in Destination addresses. If it is unchecked, the “State” field will not be shown.
When “Light vehicle” is chosen from the “Routing engine” drop-down menu, options specific to light vehicles will be displayed. These can all be adjusted, and can be set/modified on each vehicle page (see section on Vehicle management). Fig. 1.21

Fig. 1.21 Set “Light vehicle - Fastest”
If you select Yes, the calculator uses motorways. If you select No, the calculator does not use motorways
If you select Yes, the calculator uses toll sections. If you select No, the calculator does not use toll sections.
You can choose to arrive at or leave a checkpoint in the current direction of traffic; or you can ignore the traffic direction when calculating the route.
You can adjust the speed calculation. The speed for a light vehicle is an average of 18 km/h. The Speed multiplier, expressed as a percentage, adapts that average speed to your speed on the ground.
This is the average time allotted to each checkpoint on the route. The Visit duration shown will be applied as the default visit duration. It can be adjusted for each individual Destination.
Default country
When this button is checked, the “State” field is shown in Destination addresses.
When “Cycle” is chosen from the “Routing engine” drop-down menu, options specific to cycles (bikes, delivery tricycles, etc.) will be displayed. These can all be adjusted, and can be set/modified on each vehicle page (see section on Vehicle management). Fig. 1.22

Fig. 1.22 Set “Cycle - Fastest”
Choose to arrive at or leave a checkpoint in the current direction of traffic; or you can ignore the traffic direction when calculating the route.
Adjust the speed calculation. The speed for a cycle is an average of 18 km/h. The Speed multiplier, expressed as a percentage, adapts that average speed to your speed on the ground.
Time allotted to each checkpoint on the route. The Visit duration shown will be applied as the default visit duration. It can be adjusted for each individual Destination.
Default country
When this button is checked, the “State” field is shown in Destination addresses.
When “Pedestrian” is chosen from the “Route calculator” drop-down menu, options specific to pedestrians will be displayed. These can all be adjusted, and can be set/modified on each vehicle page (see section on Vehicle management). Fig. 1.23

Fig. 1.23 Set “Pedestrian - Fastest”
Choose to arrive at or leave a checkpoint in the current direction of traffic; or you can ignore the traffic direction when calculating the route.
Adjust the speed calculation. The speed for a cycle is an average of 18 km/h. The Speed multiplier, expressed as a percentage, adapts that average speed to your speed on the ground.
Time allotted to each checkpoint on the route. The Visit duration shown will be applied as the default visit duration. It can be adjusted for each individual Destination.
Default country
When this button is checked, the “State” field is shown in Destination addresses.
For the shortest route, the system calculates the route covering the shortest possible distance.
When “Light vehicle” is chosen from the “Routing engine” drop-down menu, options specific to light vehicles will be displayed. These can all be adjusted, and can be set/modified on each vehicle page (see section on Vehicle management). Fig. 1.24

Fig. 1.24 Shortest light vehicle route settings
If you select Yes, the calculator uses motorways. If you select No, the calculator does not use motorways
If you select Yes, the calculator uses toll sections. If you select No, the calculator does not use toll sections.
You can choose to arrive at or leave a checkpoint in the current direction of traffic; or you can ignore the traffic direction when calculating the route.
You can adjust the speed calculation. The speed for a light vehicle is an average of 18 km/h. The Speed multiplier, expressed as a percentage, adapts that average speed to your speed on the ground.
This is the average time allotted to each checkpoint on the route. The Visit duration shown will be applied as the default visit duration. It can be adjusted for each individual Destination.
Default country
When this button is checked, the “State” field is shown in Destination addresses.
Routes are circulated by:
Printing on paper,
SMS,
iCal file export (for Calendars),
GPS file export (for GPS navigation devices),
route export to Mapotempo Live.
The mobility/GPS partner is activated upon request when subscribing or when purchasing a fleet of devices. Only activated services are displayed.
A route sheet pdf output can be printed on paper.
In “Output” section of the “Global Settings” tab, open the “Printing” accordion Fig. 1.25:

Fig. 1.25 Set up printing of the roadmap.
If the Include map box is checked, the route sheet shows a map below the header.
If the Include plan annotating box is checked, there is a space for a signature to the right of the Destination line.
If the Include stop time box is checked, stop times are shown in the column on the right of the table.
If requested from Support, barcodes can be generated for each checkpoint. They will be shown beneath the name of the checkpoint. Barcodes are generated from the Destination reference.
Printable road sheets look like this: Fig. 1.26:
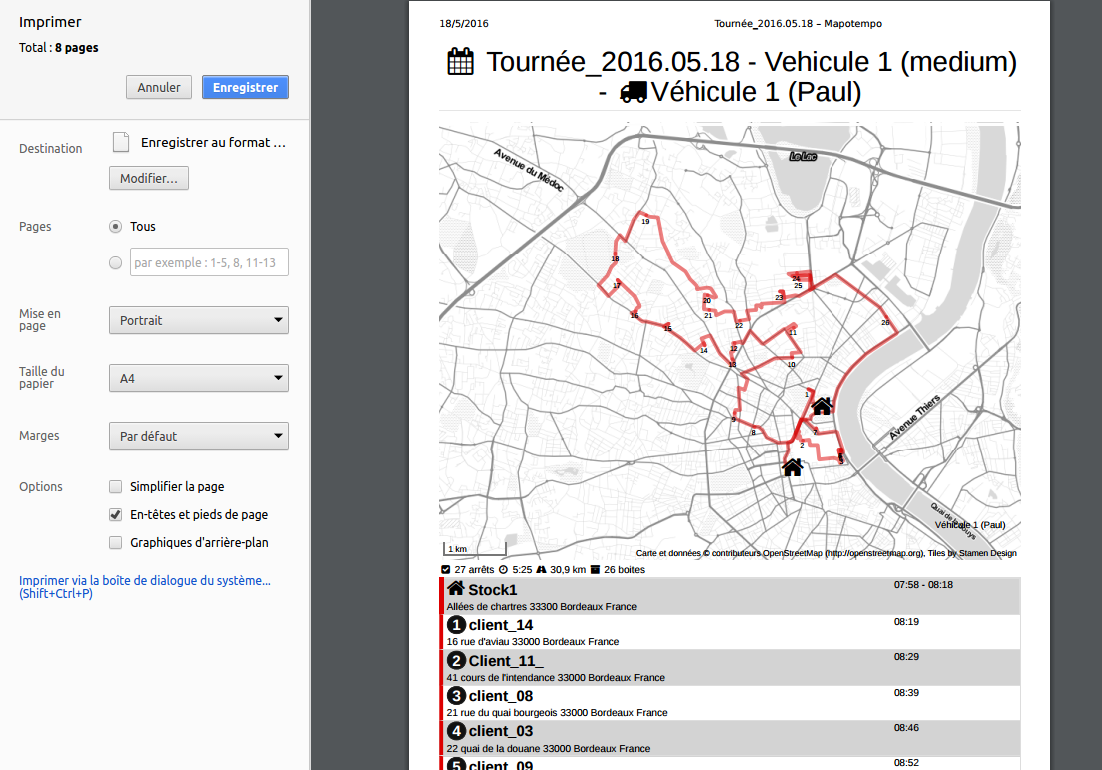
Fig. 1.26 Printable route sheets.
Note
From the Plans page, clicking on the export icon  gives you the option to Print.
Paramétrage des impressions et envois à Mapotempo Live
Afficher les unités livrables : vous pouvez à l’aide de ce bouton choisir ou non d’afficher vos unités livrables dans l’application mobile ainsi que sur la feuille de route
Choisir les unités livrables à imprimer / envoyer : ce champ s’affiche à condition que “afficher les unités livrables” est coché, vous pouvez y sélectionner les unités livrables voulues. (si rien n’est sélectionné, toutes les unités s’envoient par défaut)
Afficher les libellés : vous pouvez à l’aide de ce bouton choisir ou non d’afficher vos libellés dans l’application mobile ainsi que sur la feuille de route
Choisir les libellés à imprimer / envoyer : ce champ s’affiche à condition que “afficher les libellés” est coché, vous pouvez y sélectionner les libellés voulus. (si rien n’est sélectionné, tous les libellés s’envoient par défaut)
SMS sending is an option which can be activated upon request from Support. Additional billing is required.
In the “Outputs” section on the “Global settings” tab, open the “SMS” accordion menu. Fig. 1.27:

Fig. 1.27 Configuring SMS settings.
An SMS has 160 characters. You can activate long SMS sending. Long SMS are billed at the price of multiple SMS. If the long SMS option is unchecked, only the first 160 characters are sent.
The SMS sender can be used to send the account name to the SMS recipient.
Note
Before you can send an SMS you will need to have filled in the Destinations’ mobile phone numbers (see Destination management).
Note
From the Plans page, clicking on the export icon gives you the option to Send an SMS to customers.
The callback URL option can be activated upon request to Support. The callback URL generates the option of linking an external application to read data from routes or to synchronize them for other actions. Fig. 1.28

Fig. 1.28 Configuring callback URL settings.
Fill in the name and URL of the external application. The URL can contain the following replace strings:
{PLANNING_ID} for the Plans ID,
{PLANNING_REF} for the Plans reference,
{ROUTE_ID} for a route’s ID,
{ROUTE_REF} for a route’s reference.
Sample URLs:
Note
From the Plans page, clicking on the export icon gives you the option to export to ExternalApplicationName.
The iCal format enables you to export route timings and checkpoints to a calendar.
No setting is required to use this export.
Note
From the Plans page, clicking on the export icon gives you the option to export to an iCal calendar or to send an iCal calendar by email.
Mapotempo Live is a mobile application which assists you in working out routes for deliveries, collections, sales representatives, couriers etc. It may be linked to Mapotempo Web, which includes the vehicle settings, addresses to visit and optimized routes. Fig. 1.29

Fig. 1.29 Configuring Mapotempo Live settings.
The app can be downloaded to smartphones and/or tablets for free in just a few seconds. The Mapotempo Live section describes how the app works.
Fill in the Username and API key provided by Mapotempo Support. When the Username and API key are completed correctly, the gray box will turn green. Vehicles can receive route data.
If there is an error in the Username or API key, the box turns red.
Click on  to allocate a mobile device to a vehicle.
Note
The list of mobile devices is available from the page for each Vehicle. Allocate the appropriate mobile device directly in the Vehicle form.
Warning
WARNING: If vehicles are already set up, synchronizing will overwrite the data present in the Vehicles with the data present in the Teksat account.
Mobile devices are devices installed on board vehicles or issued to drivers. Fig. 1.30

Fig. 1.30 All interfaceable mobile services
Export to GPS navigation systems is supported on the following mobile devices:
One or more mobile device(s) will be linked upon request to Support. Sign-in boxes are displayed at the bottom of the “Global settings”.

Fig. 1.31 Alyacom Settings box.
Fill in the ID and API key for your Alyacom account. Vehicles can receive route data. When the credentials are filled in correctly, the gray box turns green.
If there is an error in the Username or API key, the box turns red.
Note
The list of mobile devices is available from the page for each Vehicle. Allocate the appropriate mobile device directly in the Vehicle form.

Fig. 1.32 Masternaut settings box.
Fill in the Username and Password for your Masternaut account Vehicles can receive route data. When the credentials are filled in correctly, the gray box turns green.
If there is an error in the Username or Password, the box turns red.
Note
The list of mobile devices is available from the page for each Vehicle. Allocate the appropriate mobile device directly in the Vehicle form.

Fig. 1.33 Notico Deliv’ settings box.
Fill in the FTP server address, the directory on the FTP server, the User and the Password for your Notico Deliv’ account. Vehicles can receive route data. When the credentials are filled in correctly, the gray box turns green.
If there is an error in the FTP server address, FTP server directory, User or Password, the box turns red.
Note
The list of mobile devices is available from the page for each Vehicle. Allocate the appropriate mobile device directly in the Vehicle form.

Fig. 1.34 Orange Fleet Performance settings box.
Fill in the Username and Password for your Orange Fleet Performance account. Vehicles can receive route data. When the credentials are filled in correctly, the gray box turns green.
If there is an error in the Username or Password, the box turns red.
Click on to allocate a mobile device to a vehicle.
Note
The list of mobile devices is available from the page for each Vehicle. Allocate the appropriate mobile device directly in the Vehicle form.
Warning
WARNING: If the vehicles are set up, synchronization erase present datas in the vehicles with the present datas in the Orange Fleet Performance account.

Fig. 1.35 Praxedo Settings box.
Fill in the Login, Password, Intervention code for the start point, Intervention code for the stop point, the Code for the material to deliver and the Code for the route from your Praxedo account. Vehicles can receive route data. When the credentials are filled in correctly, the gray box turns green.
If there is an error in the Login, Password, Intervention code for the start point, Intervention code for the stop point, Code for the material to deliver and the Code for the route, the box turns red.
Note
The list of mobile devices is available from the page for each Vehicle. Allocate the appropriate mobile device directly in the Vehicle form.

Fig. 1.36 SuiviDeFlotte Settings box.
Fill in the Username and Password for your SuiviDeFlotte account. Vehicles can receive route data. When the credentials are filled in correctly, the gray box turns green.
If there is an error in the Username or Password, the box turns red.
Note
The list of mobile devices is available from the page for each Vehicle. Allocate the appropriate mobile device directly in the Vehicle form.

Fig. 1.37 Teksat Global Settings.
Fill in the Customer ID, URL, Username and Password for your Teksat account. Vehicles can receive route data. When the credentials are filled in correctly, the gray box turns green.
If there is an error in the Username or Password, the box turns red.
Click on to allocate a mobile device to a vehicle.
Note
The list of mobile devices is available from the page for each Vehicle. Allocate the appropriate mobile device directly in the Vehicle form.
Warning
WARNING: If vehicles are already set up, synchronizing will overwrite the data present in the Vehicles with the data present in the Teksat account.

Fig. 1.38 Trimble Settings box.
Fill in the Customer account, Username and Password for your Trimble account. Vehicles can receive route data. When the credentials are filled in correctly, the gray box turns green.
If there is an error in the Customer account, Username or Password, the box turns red.
Note
The list of mobile devices is available from the page for each Vehicle. Allocate the appropriate mobile device directly in the Vehicle form.

Fig. 1.39 TomTom WebFleet settings box.
Fill in the Account name, User and Password for your TomTomWebFleet account. Vehicles can receive route data. When the credentials are filled in correctly, the gray box turns green.
If there is an error in the Account, Username or Password, the box turns red.
Click on to allocate a mobile device to a vehicle.
Note
The list of mobile devices is available from the page for each Vehicle. Allocate the appropriate mobile device directly in the Vehicle form.
Note
Destination addresses found in TomTom WebFleet can be imported directly from the Destination import page.
Warning
WARNING: If vehicles are already set up, synchronizing will overwrite the data present in the Vehicles with the data present in the Teksat account.
Each user has their own individual “User settings” to customize their interface, configure their login credentials etc.
To access the “User Settings” page, click on the right menu, then select “User Settings” Fig. 1.40.

Fig. 1.40 Access to User settings.
The settings page for the logged in user is displayed Fig. 1.41:

Fig. 1.41 User settings.
This is the time zone used as the basis for planning and optimization calculations.
From the “Base Map” drop-down menu, choose your preferred background map.
Note
On the Plans page, the Layers icon ![]() allows you to switch temporarily to a different base map.
allows you to switch temporarily to a different base map.
Map backgrounds are updated regularly. Different map backgrounds are available, depending on the routing engine.

Fig. 1.42 Base map

Fig. 1.43 Black & White map base.

Fig. 1.44 Mapnik base map.

Fig. 1.45 Mapnik-fr base map.

Fig. 1.46 LV satellite base map.

Fig. 1.47 HW satellite base map.

Fig. 1.48 Here base map
Routing engine |
Available base maps |
| LV Europe/France | Base |
| Black & White | |
| Mapnik | |
| Mapnik-fr | |
| Satellite | |
| LV Europe/France – HV | Here |
| Satellite | |
| LV Europe | Base |
| Black & White | |
| Mapnik | |
| Satellite | |
| LV-HV World (Here) | Here |
| Satellite | |
| LV Israel | Base Israel |
| Black & White | |
| LV Morocco | Black & White |
| Mapbox Street Morocco | |
| LV Pieces of World | Base |
| Black & White | |
| Mapnik | |
| Mapnik-fr | |
| LV Pieces of World – HV World | Here |
| Satellite | |
| Bêta LV-HV Europe/France (OSRM) | Base |
| Black & White | |
| Mapnik | |
| Mapnik-fr | |
| Satellite | |
| Bêta LV-HV World with trafic | Here |
| Satellite |
The “Preferred unit” drop-down menu allows you to choose which unit will be used (b) to express the route distance, either in Km (kilometers) or Miles. All distance data will be shown in the chosen unit.
The URL click2call option, which can be activated on request by Support, calls the VOIP (Voice over Internet Protocol) service you use.
Note
With one click, the Destination is called from the list of Destinations, the Destinations form and the Checkpoint popup in the Plan.
The URL must pick up the {TEL} parameter from the phone number position. Here is an example of a click2call URL: http://www.fournisseurTelephoneIP.fr?tel=0102030405
An API (Application Programming Interface) key is a code which enables different IT services to identify a program. It is provided for connection to various different applications.
It cannot be edited or deleted.
The role is specified in the user settings. This is shown in brackets to the right of the account name. When nothing is shown in brackets to the right of the account name, all rights are open to the user.
There are three types of account: 1. No role: the user has all rights 2. Guest: the user can read, view, display and hide all data present on the account. 3. Reporting only: the user can read and view reports and user settings.
This is how the roles are shown in Mapotempo:
In the account name, the Guest role: Fig. 1.49

Fig. 1.49 Account name with Reporting only role.
In the account name, the Reporting only role: Fig. 1.50

Fig. 1.50 Account name with Reporting only role.
In the Role field on the user settings page, the Guest role: Fig. 1.51

Fig. 1.51 Guest role field.
In the Role field on the user settings page, the Reporting only role: Fig. 1.52

Fig. 1.52 Reporting only role field.
Note
To enable access according to role, contact support by phone (+33 (0)5 64 27 05 83) or by email (support@mapotempo.com).
At the bottom of the “User Settings” page, click “Change your login credentials and password”; the requested page is displayed: Fig. 1.53

Fig. 1.53 Change your password.
This page allows you to change information set when you subscribed:
Email: enter a new email to change email
Current password: enter your current password. Without this information, you cannot change your password.
New password: enter your new password
Confirm password: re-enter your new password
Click “Update” to save the change
Want to add vehicles to your subscription, request a quote, subscribe to an option? Our sales team will answer you as soon as possible.
or Tel. +33 (0) 5 64 27 04 55
* From Monday to Friday 9 am - 5 pm (Paris time) without interruption
You have suggestions, you want to report a bug, ask for information? Our help desk team will answer you as soon as possible.
ou Tél. 05 64 27 05 83
* From Monday to Friday 9 am - 5 pm (Paris time) without interruption
