Two levels of vehicles set up coexist in Mapotempo:
Vehicles configuration: used to define the characteristics of a fleet of vehicles. Those characteristics can be overwritten in the configuration for each vehicle.
Vehicle setting: used to define the specific characteristics of individual vehicles.
Menus preceded by a vertical blue arrow ![]() drop down to display items for selection. Once information is stored in the section, items are displayed permanently.
drop down to display items for selection. Once information is stored in the section, items are displayed permanently.
The vehicle configuration(s) determine general settings for a fleet of vehicles. For example, they enable you to differentiate between vehicles used at different times, such as morning and afternoon.
..note :: On request to the support, the “Multiple configurations” are set up. They are essential for any activity undergoing recurrent variation.
The “List” page allows you to manage and configure your vehicles. To access it, click on the « Vehicles » menu and select « List » Fig. 1.54.
Fig. 1.54 Access the vehicle menu.
In case of unic configuration, the List page of Vehicle menu displays:
the name of the vehicles configuration and the action buttons on the vehicles configuration
vehicles list :numref: vehicles_list

Fig. 1.55 Unic configuration page.
Note
In case of unique configuration, clicking on the Vehicle menu, the vehicles list displays in the drop-down menu 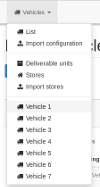 .
.
In case of multiple configuration, Vehicles List page displays Vehicles configurations (name and actions buttons on each vehicle configuration). :numref: configurations_vehicles

Fig. 1.56 Multiple configurations page.
Vehicles are editable in each vehicle configuration.
To edit vehicles configuration, click on “Edit” button  on the correct vehicles configuration.
Editing page opens with informations to modify or add.
The open page allows you to create a default configuration for your vehicles edit_vehicles_configuration.

Fig. 1.57 Edit vehicles configuration page.
Name: name the configuration according to your convenience in order to distinguish the different configurations.
** Departure / Arrival **: select from the drop-down menu the places of departure and arrival, among the stores created. By selecting “None”, the route starts at the first destination and / or ends at the last destination.
Time shifts: set the start and end times of your mobile staff,
Service time (before / after): the preparation times at the beginning and end of the day, without the time spent on the road,
Work time: indicate the working time of your mobile staff. The working time must be less than the working hours (service included without the break).

Fig. 1.58 Edit vehicles configuration page.
Maximum distance: set the maximum distance that your vehicle can travel, expressed in km,

Fig. 1.59 Edit rest settings.
Rest duration / place: the duration of the break for the driver, as well as the place (eg a “store”),
Rest time window (departure/arrival): between which hours the rest can be taken (example: from 13:15 to 14:00, means that the rest period should start between 13:15 and 14:00).

Fig. 1.60 Edit vehicles costs.
9. Coût horaire : indiquer en € le coût conducteur (rémunération, côtisations employeurs, frais de déplacement) Le montant indiqué est multiplié par le nombre d’heures nécessaires à la réalisation de la tournée.
10. Coût kilométrique : indiquer en € le coût véhicule (carburant, pneumatiques, entretien-réparations, péages (optionnels)) Le montant indiqué est multiplié par le nombre de kilomètres réalisés pendant la tournée.
11. Coût journalier fixe : indiquer en € le coût fonctionnement (financement et renouvellements du véhicule, assurances, taxe à l’essieu, coûts indirects de structure) Le montant indiqué est multiplié par le nombre de jours nécessaires à la réalisation de la tournée.
Note
Costs calculated in this way can be viewed on the Plan page in the information summary for individual routes or for the Plan as a whole.
In case of unic configuration, the vehicles configuration can be modified by Import vehicles configurations.
Note
These default constraints will be passed on to all vehicles associated with this configuration. You can then, if necessary, specify particular constraints on each vehicle.
On “Vehicles” page > “List”, click on Duplicate button  . The duplicated configuration has between brackets the date of creation. Clicking “Modify”, the configuration page allows to Edit vehicles configuration.
To allow a backup of vehicles settings, an Export/Import function is available.
On Vehicles List, a vehicles configuration is exportable clicking on the drop down menu  . Two formats are proposed: CSV or Excel spreadsheet.
The generated file is in download folder of the PC.
The vehicles configuration file import can be used from the menu “Vahicle” > “Import configuration”.

Fig. 1.61 Vehicles Management
The vehicles configuration import page opens.

Fig. 1.62 Vehicles configuration import page
** Template **: Import templates for standard spreadsheets (Libre Office, CSV) or Excel (Microsoft) spreadsheets are available. Download and enter the columns of this template file with your informations. If your business software allows you to export these informations, copy and paste these informations into this template, keeping the column titles the same. A link “Help” allows to have more details on the content of the file to be imported.
Select file: Click on this button to select your CSV file to import into the web application.
** Replace existing vehicles **: Check to update existing vehicles (unchanged vehicle reference) and add vehicles configurations. Leave blank to add the configuration without modifying the existing vehicles.
Import: Thank to the informations from your spreadsheet, the vehicles configuration is sent.
In the case of unique configuration, vehicles import replaces the existing vehicles configuration “Default”. In the case of multiple configuration, the import adds a new configuration.
On the “Vehicles” page > “List”, click on the Destroy button  . A window asks for confirmation or cancellation.
In the case of unic configuration, destroying the vehicles configuration is impossible.
Note
The vehicles equipped with a mobility device must be set after synchronization with the mobility device up. Otherwise, the datas may be overwritten with the datas entered in the mobility device’s account.
Each vehicle is editable to specify the characteristics and constraints of the vehicle (schedules, etc.)
In the case of unic configuration, edit page is available:
with the “Vehicle” menu > “vehicle_name” of the desired vehicle ,
with “Vehicles” menu > “List”, click on “Edit” button of the desired vehicle. Fig. 1.63

Fig. 1.63 Vehicle menu.
In the case of multiple configurations, the vehicle modification page can be accessed via the “Vehicles” > “List” menu.
Note
From Plans page, vehicles setup is available with the  button placed above the routes.
Menus preceded by a right-pointing blue arrow ![]() drop down to display items for selection. Once information is stored in the section, items are displayed permanently.
drop down to display items for selection. Once information is stored in the section, items are displayed permanently.

Fig. 1.64 Vehicle editing
Name: name the vehicle in order to distinguish the different vehicles,
Start / End: select in the drop down menu, the places of departure and arrival, among the created stores. Selecting “None”, the route starts at the first destination and/or ends at the last destination.
Time shifts: set the start and end times of your mobile staff.
Service time: the preparation times at the beginning and end of the day, without the time spent on the road.
Work time: staff working time, it is often a legal term.
Fig. 1.65 Edit vehicles configuration page.
Maximum distance: set the maximum distance that your vehicle can travel, expressed in km,

Fig. 1.66 Vehicle capacities
Capacities (optional): define the maximum capacity of your vehicle according to the deliverable units of your choice (number of meals, number of packages, volume, weight, etc.) Vehicle capacity must be consistent with Quantities entered during Destination setup. This constraint is not blocking in the optimization calculations. You can setup as many deliverable units you need for the same vehicle. This is especially useful when your vehicle has several capacity limits: in volume and weight for example,

Fig. 1.67 Vehicle skills
Skills (optional): skills are the reflect of the created Tags. One or more skill can be affected to a vehicle. They make it possible to associate with this vehicle specific business skills. For example, the tag “hatch” allow to specify the need of visiting the destination with a vehicle with a hatch ; the skill “hatch” indicates that the vehicle has a hatch. A skill forces the calculation to integrate visits or destinations to the vehicle with the skill. Important: a vehicle can have one (or several) skill(s). The skills must be declared to each vehicle (the skills are not taken in account if they are not declared),
Note
Tags can be created during new Plan, Zoning and Deliverable Units creation. They are displayed in “Destinations” > “Tags”.

Fig. 1.68 Routing engine scrolldown menu
Routing engine: the type of driving and the road situation, here “Light Vehicle - Fastest”, by default.
Heavy weights - Fastest

Fig. 1.69 Heavy weights - Fastest options
Use motorways: allow or not the route engine to use the motorways network,
Authorize toll sections: allow or not the route engine to use toll sections,
Number of trailers pulled by the vehicle: allow to define the number of trailers (maximum 4),
Vehicle weight: allow to define the vehicle weight in ton. The route engine only uses the roads able to support the vehicle,
Weight per axle: allow to define the vehicle weight per axle. The route engine only uses the roads able to support the vehicle,
Vehicle height: allow to define the vehicle height in meter. The route engine only uses the roads able to accept the vehicle,
Vehicle width: allow to define the vehicle width in meter. The route engine only uses the roads able to accept the vehicle,
Vehicle length: allow to define the vehicle length in meter,
Hazardous goods: a multiplying factor which can be used to adjust the speed of your driver-vehicle. If a driver, on a daily basis, goes faster than the route simulation, enter a value of 130 percent, which will speed up journeys in the application.
Strict compliance with truck limitations: if checked, the route engine strictly respects the forbiddings. If unchecked, it overrides forbiddings if it can not be done another way,
Speed multiplier: a multiplier factor to adjust the speed of your driver-vehicle. If your driver, on a daily basis, goes faster than the planned simulation, you can set a value of 130 percents which will accelerate the journeys in the application,
Light vehicle - Fastest

Fig. 1.70 Light vehicle - Fastest options
Use motorways: allow or not the route engine to use the motorways network,
Authorize toll sections: allow or not the route engine to use toll sections,
Arrive/Leave in the traffic direction: for safety reasons, the routing engine can leave and arrive on the right side to avoid road crossing,
Speed multiplier: a multiplier factor to adjust the speed of your driver-vehicle. If your driver, on a daily basis, goes faster than the planned simulation, you can set a value of 130 percents which will accelerate the journeys in the application,
Cycle - Fastest

Fig. 1.71 Cycle - Fastest options
Arrive/Leave in the traffic direction: for safety reasons, the routing engine can leave and arrive on the right side to avoid road crossing,
Speed multiplier: a multiplier factor to adjust the speed of your driver-vehicle. If your driver, on a daily basis, goes faster than the planned simulation, you can set a value of 130 percents which will accelerate the journeys in the application,
Pedestrian - Fastest
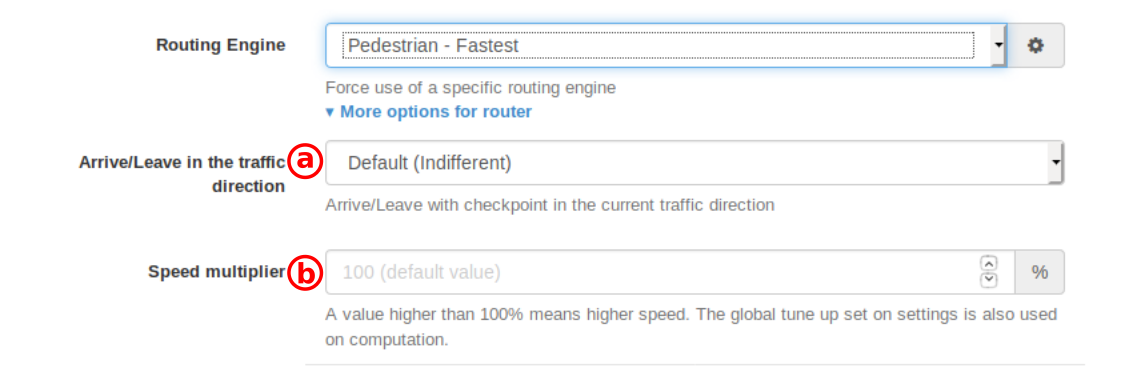
Fig. 1.72 Pedestrian - Fastest options
Arrive/Leave in the traffic direction: for safety reasons, the routing engine can leave and arrive on the right side to avoid road crossing,
Speed multiplier: a multiplier factor to adjust the speed of your driver-vehicle. If your driver, on a daily basis, goes faster than the planned simulation, you can set a value of 130 percents which will accelerate the journeys in the application,
Light vehicle - Shortest

Fig. 1.73 Light vehicle - Shortest options
Use motorways: allow or not the route engine to use the motorways network,
Authorize toll sections: allow or not the route engine to use toll sections,
Arrive/Leave in the traffic direction: for safety reasons, the routing engine can leave and arrive on the right side to avoid road crossing,
Speed multiplier: a multiplier factor to adjust the speed of your driver-vehicle. If your driver, on a daily basis, goes faster than the planned simulation, you can set a value of 130 percents which will accelerate the journeys in the application,

Fig. 1.74 Emission and consumption
Emission / Consumption (Optional): select the fuel type of the vehicle and enter the average fuel consumption according to configured unit of your vehicle in order to obtain your CO2 consumption in the optimization calculations,

Fig. 1.75 Mobility devices
The mobility devices are displayed then. The drop down menu proposes the informations to link the vehicle to the desired GPS or application. The mobile devices ou applications must be recorded in global setup to appear here. They can enabled on demand to support.

Fig. 1.76 Driver
E-mail: email of the driver (to receive the route on a mobile device),
Driver’s phone number: the driver’s telephone number.
The fields to be completed are identical to the fields in the configuration by default of your vehicles seen in a Vehicle Configuration section Fig. 1.77.

Fig. 1.77 Vehicle Configuration section
** Departure / Arrival **: select from the drop-down menu the places of departure and arrival, among the stores created. By selecting “None”, the route starts at the first destination and / or ends at the last destination.
Time shifts: set the start and end times of your mobile staff,

Fig. 1.78 Times at store
Service time (before / after): the preparation times at the beginning and end of the day, without the time spent on the road,
Fig. 1.79 Vehicle Configuration section
Work time: indicate the working time of your mobile staff. The working time must be less than the working hours (service included without the break).
Fig. 1.80 Edit rest settings.
Rest duration/place: the duration of the break for the driver, as well as the place (eg a “store”).
Rest time window (departure/arrival): between which hours the rest can be taken (example: from 13:15 to 14:00, means that the rest period should start between 13:15 and 14:00).
Fig. 1.81 Edit vehicles costs.
9. Coût horaire : indiquer en € le coût conducteur (rémunération, côtisations employeurs, frais de déplacement) Le montant indiqué est multiplié par le nombre d’heures nécessaires à la réalisation de la tournée.
10. Coût kilométrique : indiquer en € le coût véhicule (carburant, pneumatiques, entretien-réparations, péages (optionnels)) Le montant indiqué est multiplié par le nombre de kilomètres réalisés pendant la tournée.
11. Coût journalier fixe : indiquer en € le coût fonctionnement (financement et renouvellements du véhicule, assurances, taxe à l’essieu, coûts indirects de structure) Le montant indiqué est multiplié par le nombre de jours nécessaires à la réalisation de la tournée.
Note
Costs calculated in this way can be viewed on the Plan page in the information summary for individual routes or for the Plan as a whole.
This fonction allows to manage the absence or removal of a vehicle.
In the case of unic configuration, in the “Vehicle” menu > “List”,
or directly in the menu “Vehicle” > “vehicle_name”,
In the multiple configuration, click on the configuration of your choice.
Disable the vehicle-s of your choice clicking on “Disable” button  .
.
Deactivating a vehicle removes this vehicle from all route plans using it. Visits assigned to this vehicle become “Unplanned” and available for reassignment to other tours. On planning, this new distribution of stops can be done manually, via lightbulb or truck icons, or through the creation of a zoning adapted to the new configuration of vehicles.
Reactivating a vehicle, zoning must be re-assigned so that the destinations are re-assigned to the duo zoning-vehicle.
Deliverable units indicate the basic quantity, volume or weight of the deliveries or pick-up. For example, meal trays, 1m3 of trashes, etc. To acceed to deliverable units, click on “Vehicles” menu > “Deliverable units” Fig. 1.82.

Fig. 1.82 Access the deliverable units.
The «Deliverable Units» page appears. By default, a deliverable unit is already existing but without a label, nor information. Fig. 1.83.

Fig. 1.83 List of deliverable units.
After clicking “Vehicles” > “Deliverable units”, click on the button + New deliverable unit. The different fields are explained in the existing part Edit a deliverable unit. Fig. 1.84.

Fig. 1.84 Create a deliverable unit
While importing destinations, if the file contains deliverable units, deliverable units are:
created if the tag of the deliverable unit doesn’t exist,
modified if the tag of the deliverable unit exists.
After clicking on “Vehicles” > “Deliverable units”, click on Edit button. :numref: app_create_deliverable_unit

Fig. 1.85 Edit a deliverable unit.
Tag: name of the unit of your choice according to the activity : ie. package, meal or kg, etc.
Reference: A free and unique reference
Quantity by default: number of units by default delivered to each destination. It is possible to integrate negative values, in the case of pick-up for example.
Capacitiy by default: the capacity value for each vehicle. The indicated capacities are also taken into account in the vehicle configuration.
Overload coefficient: when a vehicle capacity is precised, the overload may be:
not authorized: the application calculates the routesin the vehicle capacities limits. The stops provocating an overload of the quantities are deactivated.
authorized: clicking on yes, a number can be saved ; the greater number is, the less overload will be allowed by optimisation.
ignored (by optimization) : the quantities and the capacities are not taken into account. The stops overloading are kept after optimization. The overloads are reported in the planification.
Icon: graphic designation of the deliverable unit in the library FontAwesome. This icon appears in the route header (if the vehicle is set up and at least one visit of the route is informed) and the maximum capacity in each vehicle with the concerned deliverable unit.
Let’s take, for example, a fleet of two vehicles.
Each vehicle has a maximum load capacity of 300kg.
The maximum load volume of each vehicle is 3 m3.
For each visit, a weight of 40kg and a volume of 0.5m3 are to be delivered.
From these constraints, the deliverable units are then created in kg and m3 to obtain the following deliverable units list: Fig. 1.86.
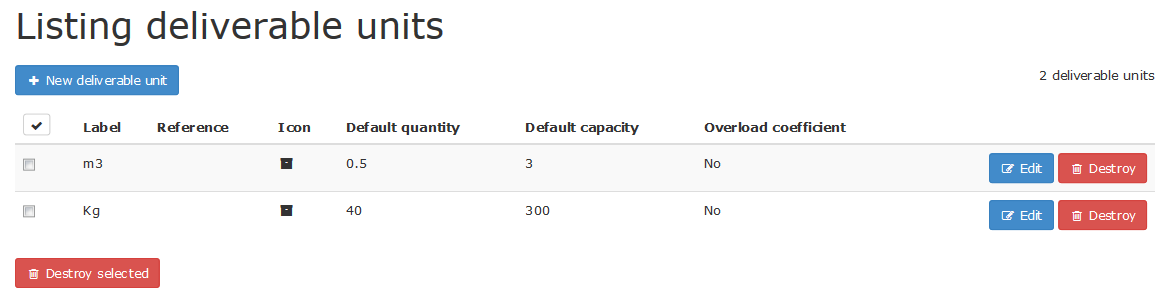
Fig. 1.86 Example of using the overload coefficient.
Overload coefficient “no”: this means that the optimization will not allow an overload.
Before optimization, it can be seen that the maximum load volume of the vehicle 2 is greater than its maximum capacity set at 3 m3. This is a situation known as « overload capacity ». The last destination is accepted in the vehicle route. Fig. 1.87.

Fig. 1.87 Not optimized tour with overtaking allowed.
After optimization, the route of the vehicle is no longer on capacity overload. The maximum load volume of 3 m3 is respected. Overtaking is penalized. The last destination is deactivated to prevent the loaded volume from being exceeded Fig. 1.88.

Fig. 1.88 Optimized tour with penalized overtaking.
Overload coefficient « yes » : the optimization will allow the overload. Destinations involving overload capacity of the vehicle will be less penalized and can be taken into account. The higher the valueis, the less the optimization allows an overload Fig. 1.89.

Fig. 1.89 Optimized tour with overtaking allowed.
The final destination is now kept in the route. However, it is reported an overload exceeding capacity.
Ignored: the optimization will allow all overflows and will systematically signal them.
After clicking on “Vehicles” menu > “Deliverable units”, click on Delete button (1) of the desired lign of deliverable unit. Fig. 1.90.
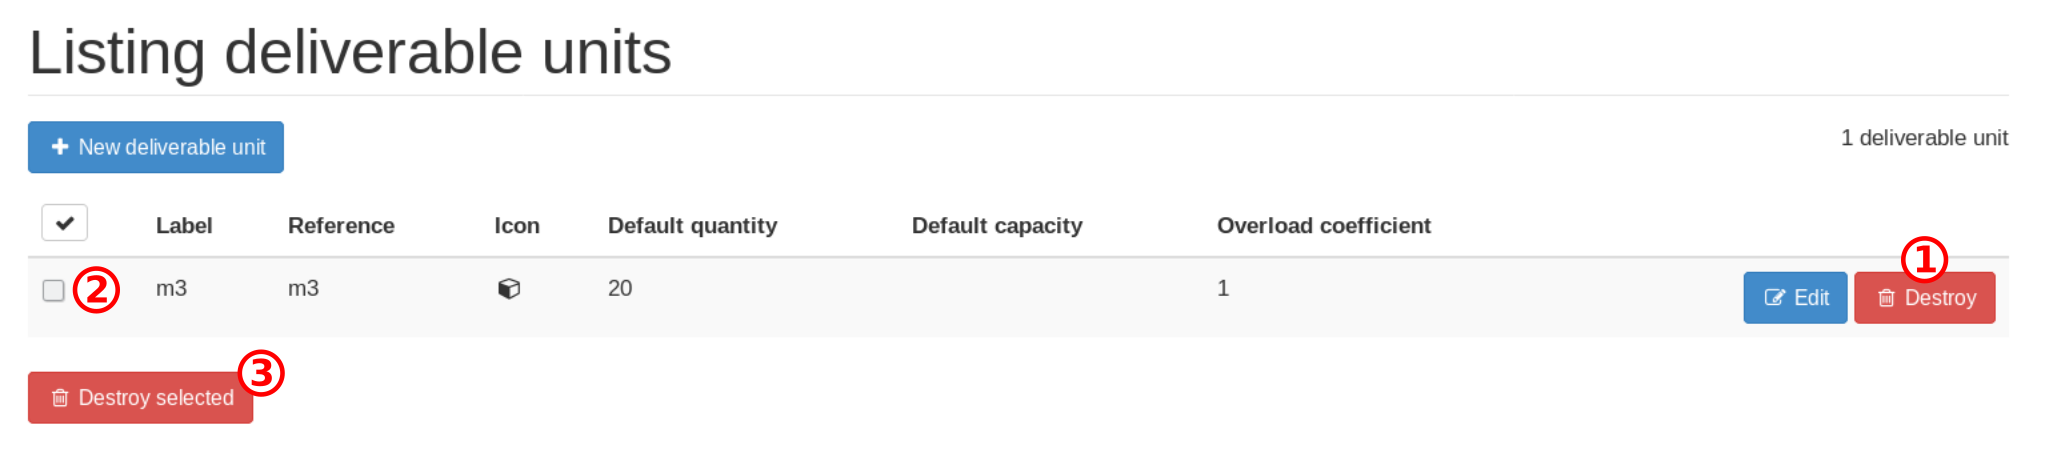
Fig. 1.90 Destroy one or more a Deliverable Unit(s)
For multiple supression, check on the left of the tag (2) the deliverable units of your choice. Click on the Delete selection button (3) at the bottom of the tab.
In each vehicle (“Vehicles” > “VehicleName”), it is possible to assign a capacity and a deliverable unit. Fig. 1.91.

Fig. 1.91 Vehicle capacity assignation
Face to Capacities title, indicate the number of deliverable units on the same lign as the desired deliverable unit(s).
In the “Destination” menu > “List” > “Edit” > “Visit” section, define the quantities (1) by visit face to the desired deliverable unit (2). Fig. 1.92.

Fig. 1.92 Quantity and deliverable unit by visit
According to your needs, you can affect Fill/Empty (3) of the lign of the deliverable unit in the drop down menu in the middle.
When at least one visit quantity (“Destination”> “DestinationName”) is entered, and the Vehicle Capacities are filled in (“Vehicle”> “VehicleName”), the deliverable units are displayed in the head of the routes. Capacities are shown next to the chosen icon (See explanations of tour header icons in the “Zoning Management” section “List of icons of the Plan and Routes”).
From “Plans” page, launching the optimization (clic on  ), a popup appens. Fig. 1.93

Fig. 1.93 Deliverable units in optimization window
The “Deliverable units” section proposes Authorized [or not] the charge overload of the defined deliverable unit.
by default, “no”, optimization takes into account the deliverable units quantities and the vehicle capacities,
“Ignore” allows to not taking into account the deliverable units quantities and the vehicle capacities, the overloads are signaled in red.
Stores are key places of departure or arrival of your vehicles. They can be used to indicate rest places of the driver. To access the « Stores » page, click on the « Vehicles » menu, then select « Stores » to display a list of your stores Fig. 1.94.

Fig. 1.94 Go to the stores menu.
The Stores list page opens: Fig. 1.95.

Fig. 1.95 Stores list page.
Several actions can be done:
There is always one store. The maximum number of stores is 10. That number can be adjusted upon request to support.
Note
On each Vehicle, it is possible not to affect stores selecting “None”. The route starts at the first destination and/or finishes at the las destination.
On the “Store” page, click on “New store” button  . Fig. 1.96 :

Fig. 1.96 Create a store.
Reference: a free reference,
Name: name the store,
** Street, Postcode / City, State / Country **: Enter the address of the store so that the tool makes geocoding and positions the address automatically on the map. In the case of incorrect geocoding, the point can be moved directly on the map to be positioned at the desired location,
![]() Geolocation icon: Clicking on this icon, a cross appears on the map to specify the address or manually determine it by clicking on the map,
Geolocation icon: Clicking on this icon, a cross appears on the map to specify the address or manually determine it by clicking on the map,
Geocoding accuracy: Inofrmation on the defined address accuracy,
Map: Display your store on the map or place it manually with the geolocation icon ![]() ,
,
Latitude/Longitude: enter the GPS coordinates of the store,
Color: select the color of the store, this color will be visible on the interactive map. Click on the brush icon  if you want to customize the color of the store via a palette.
Icon: style and size of the icon representing the store on the interactive map.
Palette of colors: it is possible via this palette to customize the color of your store on the map by moving the cross and / or the sliders. It should be noted that the appearance of the palette is different depending on the browser you are using.
Validate the entered informations by clicking the “Create Store” button  .
.
On the “Store” page, click on “Edit” button . Fig. 1.97 :

Fig. 1.97 Create a store.
Reference: a free reference,
Name: name the store,
** Street, Postcode / City, State / Country **: Enter the address of the store so that the tool makes geocoding and positions the address automatically on the map. In the case of incorrect geocoding, the point can be moved directly on the map to be positioned at the desired location,
![]() Geolocation icon: Clicking on this icon, a cross appears on the map to specify the address or manually determine it by clicking on the map,
Geolocation icon: Clicking on this icon, a cross appears on the map to specify the address or manually determine it by clicking on the map,
Geocoding accuracy: Inofrmation on the defined address accuracy,
Map: Display your store on the map or place it manually with the geolocation icon ![]() ,
,
Latitude/Longitude: enter the GPS coordinates of the store,
Color: select the color of the store, this color will be visible on the interactive map. Click on the brush icon if you want to customize the color of the store via a palette.
Icon: style and size of the icon representing the store on the interactive map.
Palette of colors: it is possible via this palette to customize the color of your store on the map by moving the cross and / or the sliders. It should be noted that the appearance of the palette is different depending on the browser you are using.
Validate the entered informations by clicking the “Create Store” button .
Note
From a routes plan, the editable form of a store is accessible by two access points indicated by the icon “Home” 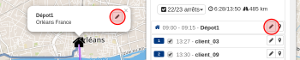 .
.
From the list of Stores, it is possible to filter in the “Filter” field | filter_button | by writing the first characters of the search. The filter covers the entire list. It only displays the lines with the sought string.
You can import a list of store into the application via a properly formatted csv file. To access the « Import stores » page, click the « Vehicles » menu and select « Import stores » Fig. 1.98:

Fig. 1.98 Access to stores import.
Clicking it, a page opens. It allows you to import a stores list Fig. 1.99.

Fig. 1.99 Import Store.
Import templates for standard spreadsheets (Libre Office, CSV) or Excel (Microsoft) spreadsheets are available. Download and enter the columns of this template file with the informations of the stores. If your business software allows you to export this information, copy this information into this template keeping the column titles the same,
Click “Choose File” to select your modified CSV file,
Update / Add: to update existing stores (unchanged store reference) and/or add new stores to the application,
Remove old stores: to delete and replace all old stores with those in your CSV file.
Click “Import”  . With the informations on your spreadsheet, the configuration of the stores is finalized.
Documentation allowing the right constitution of your CSV file. The order of the columns is free but it is necessary that the spelling of the headers is correct, hence the need to use the downloadable .csv file from the application, the latter should prevail.
Columns and use:
reference: a unique and constant reference allowing the update of this item for the next import. “”value: [text]**
name : store’s name. value: [text]
street: building number and and name of street/avenue/etc., the spelling should be correct. Exclude non-official street specifications. value: [text]
postcode: City postcode. value: [number]
city: name of the city or town. value: [text]
country: country name, spelling must be correct. value: [text]
lat: store latitude (in decimal degrees). Ex: 45.91°. value: [decimal number from -90 to +90]
lng: store longitude (in decimal degrees). Ex: 1.72°. value: [decimal number from -180 to +180]
color: the color of your store’s icon, resulting from the web colors https://en.wikipedia.org/wiki/Web_colors. value: [text]
icon: icon name locating the store on the map, resulting from the official list of font-awesome ex: fa-building. value: [text]
icon size: icon size locating the store on the map. default: medium. values: [small, medium, large]
geocoding accuracy: a score qualifying the conversion certainty of the postal address into geographical coordinates. This via a percentage expressed between 0 and 1. ex: 0.70 represents 70% reliability. value: [decimal number 0 to 1]
geocoding level: the level of accuracy reached during the conversion of the postal address in geographical coordinates, semantically expressed. values: [city, intersection, street, house, point]
From “Vehicle” page > “Stores”, two possibilities exist to “Delete a store”:
Click on “Destroy” button of the store lign to delete,
Check the box on the left of the store name to delete, click on the “Destroy selection” button  . Checking several boxes, the suppression is multiple.
Want to add vehicles to your subscription, request a quote, subscribe to an option? Our sales team will answer you as soon as possible.
or Tel. +33 (0) 5 64 27 04 55
* From Monday to Friday 9 am - 5 pm (Paris time) without interruption
You have suggestions, you want to report a bug, ask for information? Our help desk team will answer you as soon as possible.
ou Tél. 05 64 27 05 83
* From Monday to Friday 9 am - 5 pm (Paris time) without interruption