Zones are used to assign a set of visits which are geographically close and contained in one of these zones to each of your vehicles. Creation of the zones (or zoning) can be achieved in two ways:
after importing or creating a destinations list: automatically create intervention area.
having an idea of your intervention area: manually create your zones on a blank map.
Each zoning contains several zones associated with one of your vehicles. A zoning corresponds to a type of routes with specific destination requirements. It can be reused to share your visits among your vehicles Fig. 1.143.

Fig. 1.143 Example of zoning.
This distribution of visits allows visits you to create route maps which can be printed or exported in seconds.
To access Zoning creation, open the “Plans” menu. Then click on “Zonings” Fig. 1.144.
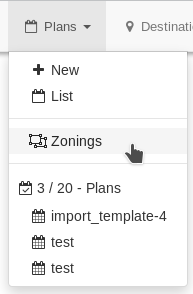
Fig. 1.144 Go to new zoning creation.
The following page opens Fig. 1.145.

Fig. 1.145 Zonings List.
Click on the New Zoning button  . Fig. 1.146

Fig. 1.146 Zoning creation page.
One the New zoning page, enter the zoning Name Fig. 1.146.
Select the plan to which you want to assign the zoning, by opening the “Destinations from plan” drop-down menu. You can select a selection of destinations to display if one of the Plans you created contains a tag to filter destinations for display (see section on Tags).
Save by clicking on the Create Zoning button  .
.
The map opens with the store at the center, if just one store has been created, or showing all stores, if there is more than one store.
To show or hide all destinations.
To generate automatic zonings according to the criteria in the drop-down “Generate” button 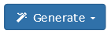 .
.
To export the zoning to a spreadsheet program.
Numerical criteria: A number of zones, visits, kilometers or deliverable units, according to needs and strategies.
A distance relative to the store: zoning boundaries are drawn an equal travelling distance from the store according to the distance entered.
Journey time from the store: zoning boundaries are drawn an equal travelling time from the store according to the time entered.
Note
To generate Isochrone zoning, the route calculator must be set to Fastest. To generate Isodistance zoning, the route calculator must be set to Shortest.
Note
Whenever zoning is created by this method, vehicle configurations must contain stores.
Zones are drawn according to the criteria set in the automatic zoning modal window. Fig. 1.147

Fig. 1.147 Automatic zonings modale.
The number of zones you want
With a simple strategy, the number of stops is divided by the desired number of zones.
With an advanced strategy, zones are balanced according to working hours divided by desired number of zones, according to the number of deliverable units divided by the desired number of zones, according to the number of kilometers to travel divided by the desired number of zones, according to the number of visits divided by the desired number of zones.
Distance calculation can be flying distance or the distance by road (Routing Engine).
Zones can be drawn starting from each store on a plan. When you click the Generate button, the isodistance or isochrone modal window opens Fig. 1.148.

Fig. 1.148 Iso zoning Modale.
Enter the distance or time to draw around the point. The zone is drawn. Fig. 1.149

Fig. 1.149 Zone drawn.
Zones can be drawn starting from each point on a plan (planned or unplanned). When you click on the point, a contextual window opens Fig. 1.150
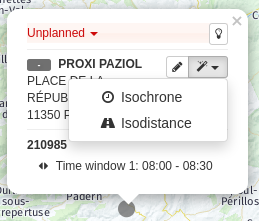
Fig. 1.150 Popup for automatic zoning from a point.
The magic wand icon ![]() enables you to draw isochrone or isodistance zoning around the point, depending on the route calculator Fig. 1.151
enables you to draw isochrone or isodistance zoning around the point, depending on the route calculator Fig. 1.151

Fig. 1.151 Iso zoning Modale.
Enter the distance or time to draw around the point. The zone is drawn Fig. 1.152

Fig. 1.152 Iso zoning Modale.
Click the icon ![]() to activate the zone editor.
to activate the zone editor.
Draw the area on the map by successive movements and clicks of your mouse. Close the zone by double-clicking or by clicking on the first point. Your zone is drawn.
A free text field is displayed for each zone you created so that you can assign a name to it (optional).
A vehicle can be assigned to your zone from the drop-down list in the menu on the right. The number of zones can match the number of vehicles.
Click on the “Save Zoning” button  .
.
Open an existing plan or create a new Plan (see the Plan and route management section).
In the right-hand panel, alongside the Zoning field, click on the + button  .
.
The map shows all the destinations present in the Plan. Destinations are shown automatically.
To show or hide all destinations.
To generate automatic zonings according to the criteria in the drop-down “Generate” button .
To export the zoning to a spreadsheet program.
Numerical criteria: A number of zones, visits, kilometers or deliverable units, according to needs and strategies.
A distance relative to the store: zoning boundaries are drawn an equal travelling distance from the store according to the distance entered.
Journey time from the store: zoning boundaries are drawn an equal travelling time from the store according to the time entered.
Note
To generate Isochrone zoning, the route calculator must be set to Fastest. To generate Isodistance zoning, the route calculator must be set to Shortest.
Note
Whenever zoning is created by this method, vehicle configurations must contain stores.
Des zones sont dessinées selon les critères définis dans la modale de Zonage automatique. Fig. 1.153
Fig. 1.153 Automatic zoning modale.
The number of zones you want
With a simple strategy, the number of stops is divided by the desired number of zones.
With an advanced strategy, zones are balanced according to working hours divided by desired number of zones, according to the number of deliverable units divided by the desired number of zones, according to the number of kilometers to travel divided by the desired number of zones, according to the number of visits divided by the desired number of zones.
Distance calculation can be flying distance or the distance by road (Routing Engine).
Zones can be drawn starting from each store on a plan. When you click the Generate button, the isodistance or isochrone modal window opens Fig. 1.154.
Fig. 1.154 Iso zoning Modale.
Enter the distance or time to draw around the point. The zone is drawn. Fig. 1.155
Fig. 1.155 Iso zoning Modale.
Zones can be drawn starting from each point on a plan (planned or unplanned). When you click on the point, a contextual window opens Fig. 1.156
Fig. 1.156 Popup for zoning from a point.
The magic wand icon ![]() enables you to draw isochrone or isodistance zoning around the point, depending on the route calculator Fig. 1.157
enables you to draw isochrone or isodistance zoning around the point, depending on the route calculator Fig. 1.157

Fig. 1.157 Iso zoning Modale.
Enter the distance or time to draw around the point. The zone is drawn. Fig. 1.149
Fig. 1.158 Iso zoning Modale.
Click the icon ![]() to activate the zone editor.
to activate the zone editor.
Draw the area on the map by successive movements and clicks of your mouse. Close the zone by double-clicking or by clicking on the first point. Your zone is drawn.
A free text field is displayed for each zone you created so that you can assign a name to it (optional).
A vehicle can be assigned to your zone from the drop-down list in the menu on the right. The number of zones can match the number of vehicles.
Click on the “Save Zoning” button .
The ![]() icon creates areas (see previous section). Fig. 1.159
icon creates areas (see previous section). Fig. 1.159

Fig. 1.159 Edit zones.
The ![]() icon lets you change your zones by clicking and dragging the corners of the polygon (2). It is important to confirm your changes (3) Fig. 1.159.
icon lets you change your zones by clicking and dragging the corners of the polygon (2). It is important to confirm your changes (3) Fig. 1.159.
The ![]() icon allows you to delete an area by clicking the chosen one. It is important to confirm your changes (3).
icon allows you to delete an area by clicking the chosen one. It is important to confirm your changes (3).
Note
Both edit and delete operations require you to confirm the operation (3), otherwise the changes will be lost
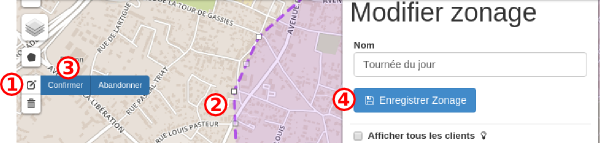
Fig. 1.160 Confirm and save zoning changes.
When you have finished your editing, click the “Save Zoning” button (4). Once your zoning is saved, you can plan and optimize your routes in the “Edit Plan” page of the selected plan (described in the “Optimize routes”).
The zonings you create can be accessed from the drop-down menu alongside the Zonings field in the panel to the right of a Plan page. They can be single or multiple. Fig. 1.161

Fig. 1.161 Drop-down zoning menu
Click on the drop-down arrow to the right of the Zoning field. Select the zoning(s) you want; or type the first characters of the zoning(s) you want, then select the zoning(s) you want Fig. 1.162

Fig. 1.162 Selected zonings
The zoning button appears in orange  . Click.
A confirmation window checks that you really want to apply the zoning. If zoning is not applied, only zones will appear on the plan. Points remain in routes. Data present will be overwritten when zoning is applied. Fig. 1.163

Fig. 1.163 Zoning warnings modal window
A modal window appears while zoning is applied. Fig. 1.164

Fig. 1.164 Apply zoning modale
Destinations are assigned to a zone, and thus to a vehicle. Fig. 1.165

Fig. 1.165 Plan with zoning
In addition to showing sectors, zonings are part of the optimization strategy for various routes. Fig. 1.166

Fig. 1.166 Optimization strategies
After creating zoning manually (see section on Zonages manuels (manual zoning)) and applying the zoning to the Plan, stops are assigned to the appropriate zone.
When you click on the optimization icon for each route ![]() , the points are ordered and the route optimized.
, the points are ordered and the route optimized.
After creating zoning automatically (see section on Automatic zoning) and applying the zonage to the Plan, stops are assigned to the appropriate zone.
When you click on the optimization icon for each route ![]() , the points are ordered and the route optimized.
, the points are ordered and the route optimized.
Global optimization is explained in detail in the “Plan and route management” section.
No zoning is defined. Global optimization is launched by clicking the “global optimization” button ![]() . Destinations are distributed across optimized routes.
. Destinations are distributed across optimized routes.
Having created a zoning and applied that zoning to the Plan, launch global optimization by clicking on the “global optimization” button ![]() . Destinations are distributed across optimized routes in accordance with the zones drawn.
. Destinations are distributed across optimized routes in accordance with the zones drawn.
Zoning can define zones to bypass, exclude or avoid.
Using the Heavy goods vehicle - fastest (Time) routing engine, draw a manual or automatic zone (see Creating a zoning section). In the right-hand panel, check the “Don’t go inside this zone” box  for the zone(s) to be excluded from routes. Fig. 1.167

Fig. 1.167 Plan with excluded zones.
The zone whose box is checked appears hatched in red on the map.
Note
If the “Don’t go inside this zone” field does not appear, please contact Support to select the correct routing engine.
Exporting a zoning allows you to keep sectors on a given date with the destinations assigned to each zone.
On the page of the zoning you wish to export, check the Show all destinations button Fig. 1.168

Fig. 1.168 Export a zoning.
Choose the format you want: Excel CSV, Excel or standard CSV) Fig. 1.169

Fig. 1.169 Choose the zoning export format.
The file is downloaded to the chosen destination.
Want to add vehicles to your subscription, request a quote, subscribe to an option? Our sales team will answer you as soon as possible.
or Tel. +33 (0) 5 64 27 04 55
* From Monday to Friday 9 am - 5 pm (Paris time) without interruption
You have suggestions, you want to report a bug, ask for information? Our help desk team will answer you as soon as possible.
ou Tél. 05 64 27 05 83
* From Monday to Friday 9 am - 5 pm (Paris time) without interruption