The whole set of plans is visible from Plans > List. The following page opens Fig. 1.170:
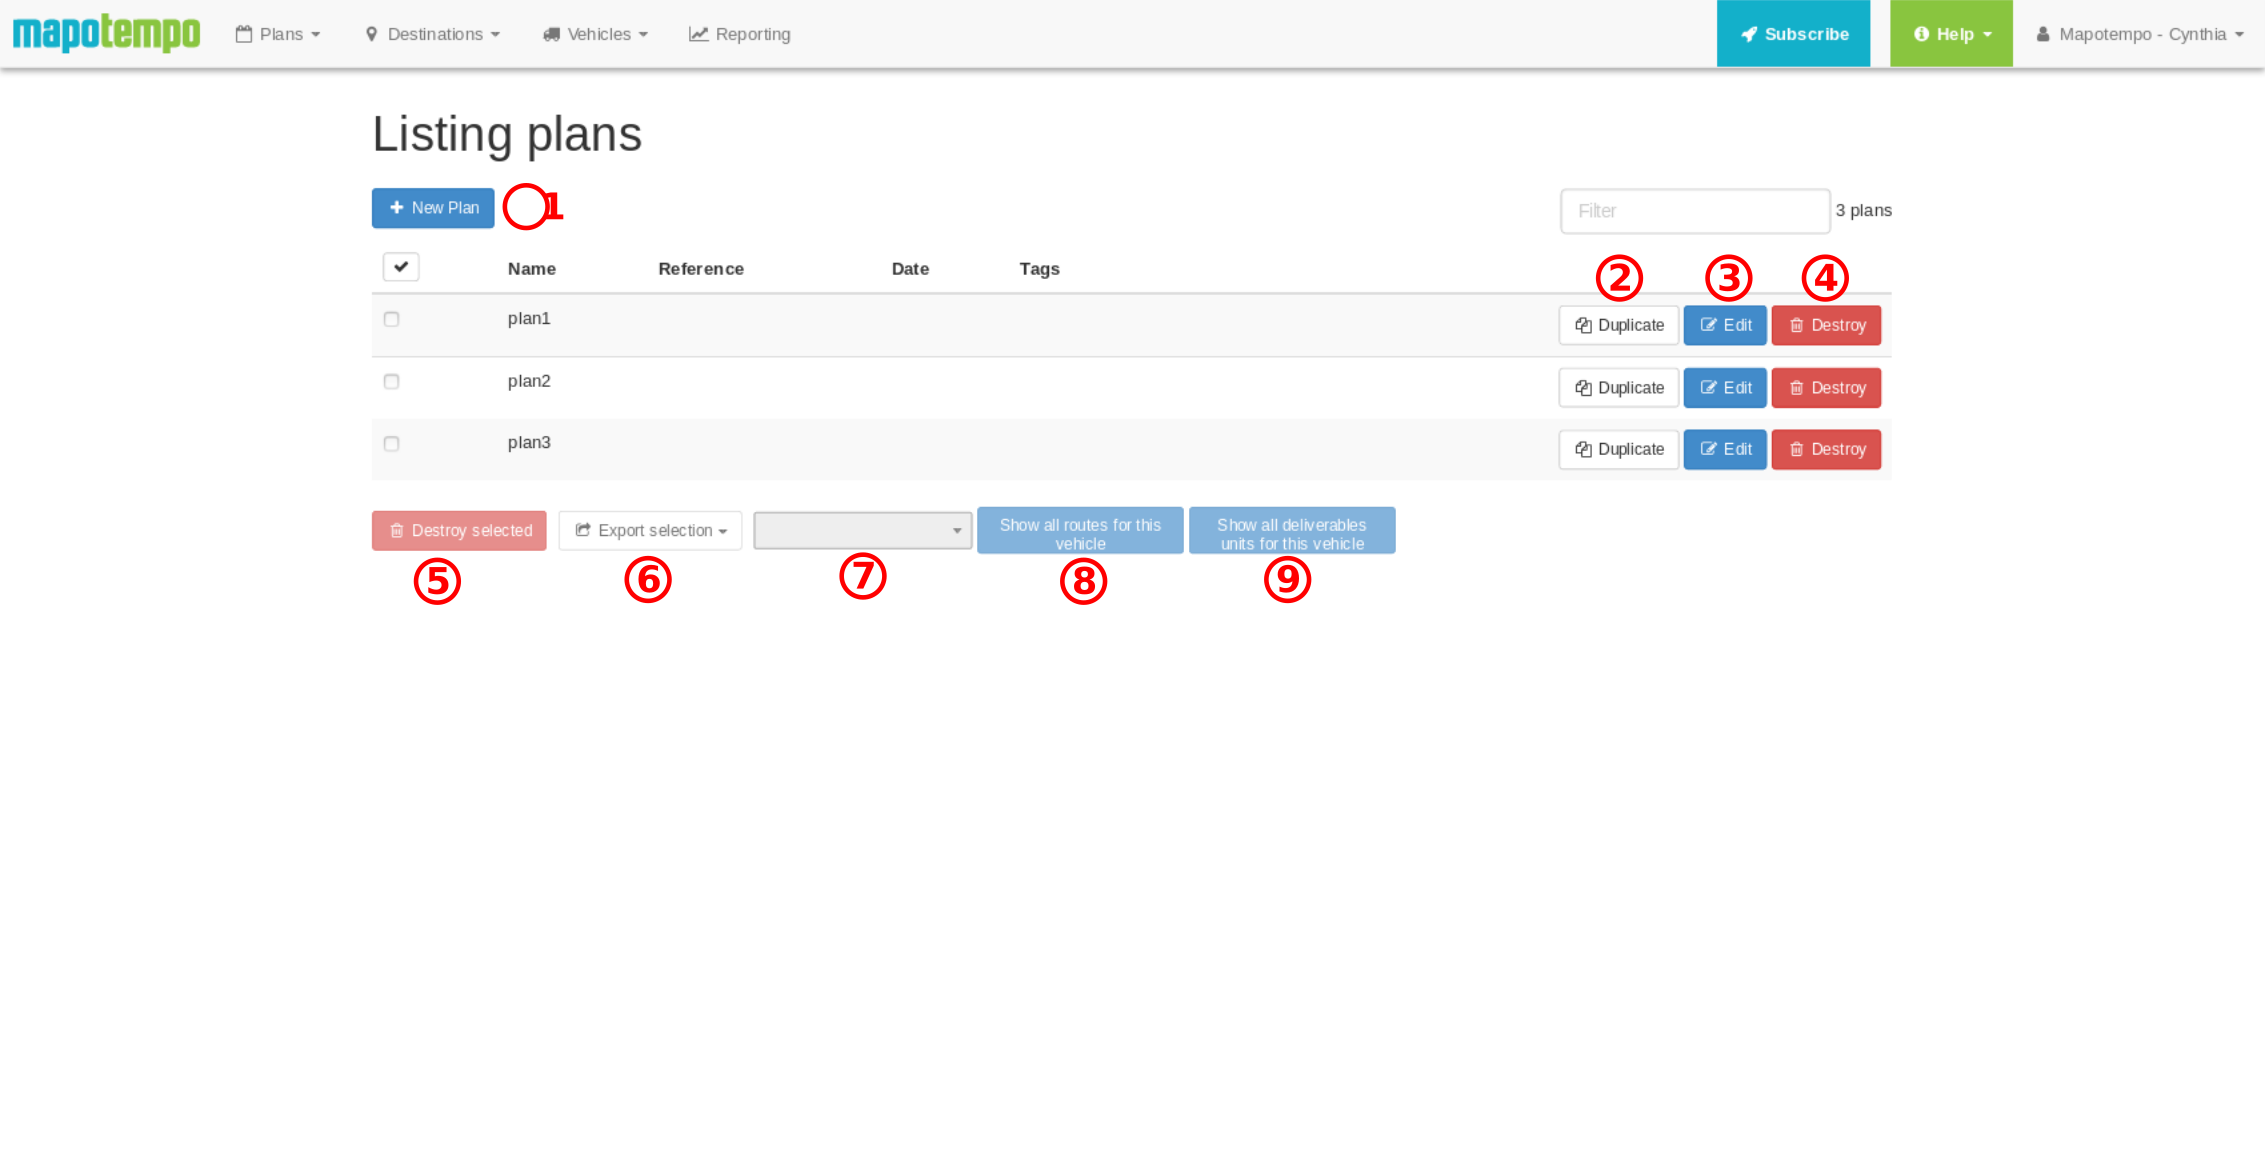
Fig. 1.170 List of plans
creating a new plan by clicking the  button
copying a plan by clicking the  button
changing a plan by clicking on the  button
deletion of a plan by clicking the  button
When a plan checkbox is checked, the buttons below the list become active. Possible actions for one or more plan(s) are:
multiple deletion by checking the box(es) next to the relevant plan(s) and clicking on the 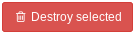 button
export: plan(s) can be exported in iCal format for calendars or csv/xls for spreadsheets
viewing the Vehicle’s routes view by selecting a vehicle from the drop-down menu (7) and clicking on the “Show all routes for this vehicle” button
viewing the Vehicle’s deliverables by selecting a vehicle from the drop-down menu (7) and clicking on the “Show all deliverables units for this vehicle” button
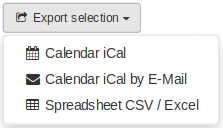
Fig. 1.171 Plan export button
Note
The number of plans is limited to 20 by default. If necessary, contact Support to increase the number of plans available. Having too many plans can slow down the system.
A plan allows you to organize your routes, assigning each vehicle n visits along ordered and planned routes. The plans page allows you to:
view your destinations, zoning and routes,
manage and modify your routes intuitively, mainly by moving your destinations between the routes
optimize your journey, using our calculator,
easily export your plans to your connected mobiles or GPS devices.
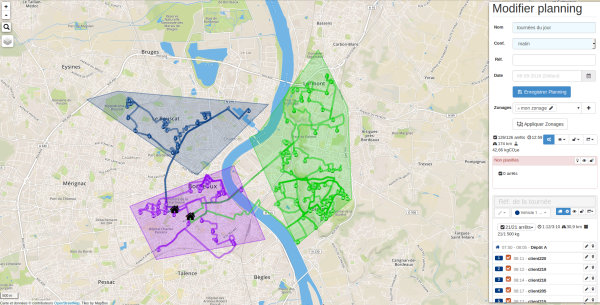
Fig. 1.172 Route plans.
On the left, the interactive map allows you to view your zoning, your stops and your routes.
Vous pouvez sur les boutons à gauche de la carte : - zoomer ou dézoomer la carte - rechercher une adresse - compacter ou non vos points - générer un isochrone - générer un isodistance
À droite, le tableau de bord du plan se partage en plusieurs parties :
The characteristics of the plan (name, configuration of the vehicles, assigned zoning). Fig. 1.173
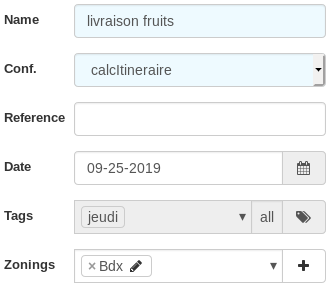
Fig. 1.173 the characteristics of the plan.
The summary of the planned routes in time, distance and carbon emissions. Fig. 1.174
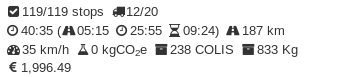
Fig. 1.174 Summary of the planned routes.
The route(s) selector enables you to display only the information you want.
Unplanned stops, meaning stops not assigned to a vehicle, if they are selected in the selector.
The routes for each vehicle with its stopping points, when they are selected in the selector.
The use of these elements is detailed in the following sections.
By default, all unplanned points and all routes are displayed. To select the desired data, simply left-click on the route(s) in the box to the left of the route name. Fig. 1.175
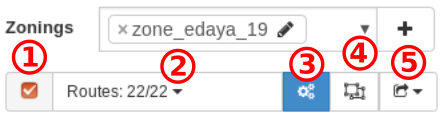
Fig. 1.175 Routes selector.
It can be used to select a section of routes to display only the ones you want.
This comprises:
a checkbox (checked by default, meaning that all routes are selected)
a clickable arrow used to open the drop-down menu
a global optimization button for the selected routes
a zoning application button. To activate it, one or more zones must be selected in the Zonings field
a route export button, with drop-down options for route exports
Note
Routes equipped with an NFC reader (e.g. SOPAC Sopalog) display a box for temperatures read.
The actions apply to the selected route(s).
When you click on the downward arrow, the menu drops down. Fig. 1.176
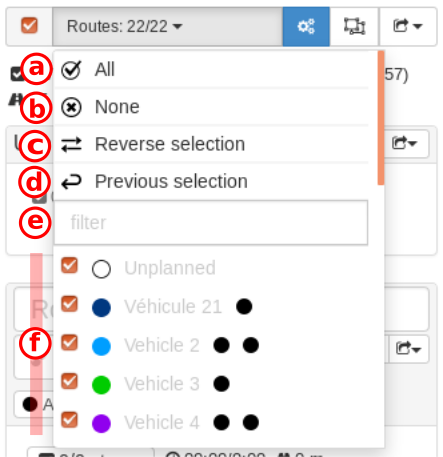
Fig. 1.176 Route selector open.
The menu allows you:
to select all routes/vehicles by clicking on All
to deselect all routes/vehicles by clicking on None / or to select no routes by clicking on None
to swap the selection, meaning that unselected routes are selected, and selected routes are deselected
to return to the previous selection
to search for the route/vehicle to select by filtering the list of route names
to select the route(s)/vehicle(s) using the checkbox to the left of the name
Only the selected routes are visible. Actions taken will be launched only for the selected routes.
To the top right of the plan dashboard, the four-headed arrow button  opens Expanded view.
The header of each route displays information and action buttons Fig. 1.177
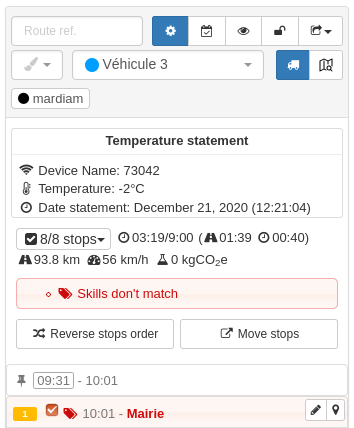
Fig. 1.177 Routes header.
Here are the details of the actions possible on each route:
Text field where the route reference can be entered
 Use this button to optimize the route
![]() Button used to set the date of the route / |calendar_check_icon| This icon shows the date has been set. Change the date by clicking on it. The route date must be later than the plan date.
Button used to set the date of the route / |calendar_check_icon| This icon shows the date has been set. Change the date by clicking on it. The route date must be later than the plan date.
 Use this button to hide/display the route
 Use this button to lock/unlock the route
 Drop-down menu so you can export the route
 Drop-down menu so you can select a color for the route
Here are the details of the actions possible on each route: - Text field to show the route reference - Route optimization button - Button to show/hide the route - Button to lock/unlock the route - Drop-down route export menu - Drop-down route color selection menu -  Drop-down route vehicle selection menu -
  Route’s allocated vehicle page button -
  Center map on route’s allocated vehicle button - Vehicle capabilities information - Route summary information - Route error messages -
  Multiple stop movement button
Use this button to open the page for the vehicle assigned to the route
This button centers the map on the route vehicle
Shows vehicle skills
Summary route information
Route error messages
Use this button to move multiple stops
Vehicles can be viewed on the map due to their GPS or geolocation. This function can be activated upon request to support. Fig. 1.178
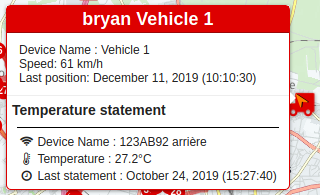
Fig. 1.178 Viewing the vehicle window.
When you move the mouse over a vehicle, a popover opens with information about the vehicle: name, speed, temperature readings (if set up), ETA (if set up, etc.)
Note
With the mobile application, Mapotempo Live, the vehicle’s track can be seen on the current route plan.
When you hover over or click on a stop on the plan, a contextual window opens. Fig. 1.179

Fig. 1.179 Window for a stop on the map
Assign this point to another vehicle Fig. 1.180

Fig. 1.180 Drop down the list of vehicles.
Check/Uncheck the stop to plan or unplan it.
Go to the destination page for the stop  .
.
Generate an isochrone or isodistance zoning from the point  . The drop-down menu offers to draw an isodistance zoning (zoning around a point where the distance is constant) or isochrone zoning (zoning around a point where the journey time is constant).
A line separates off the next section. The position in the route order, destination name and precise address are shown in that section.
A final section, separated by a line, presents delivery information: quantity, scheduled time, ETA, visit duration etc.
When you click the four-headed arrow button on the routes dashboard, the drop-down view opens, showing the state of construction of the route. Fig. 1.181
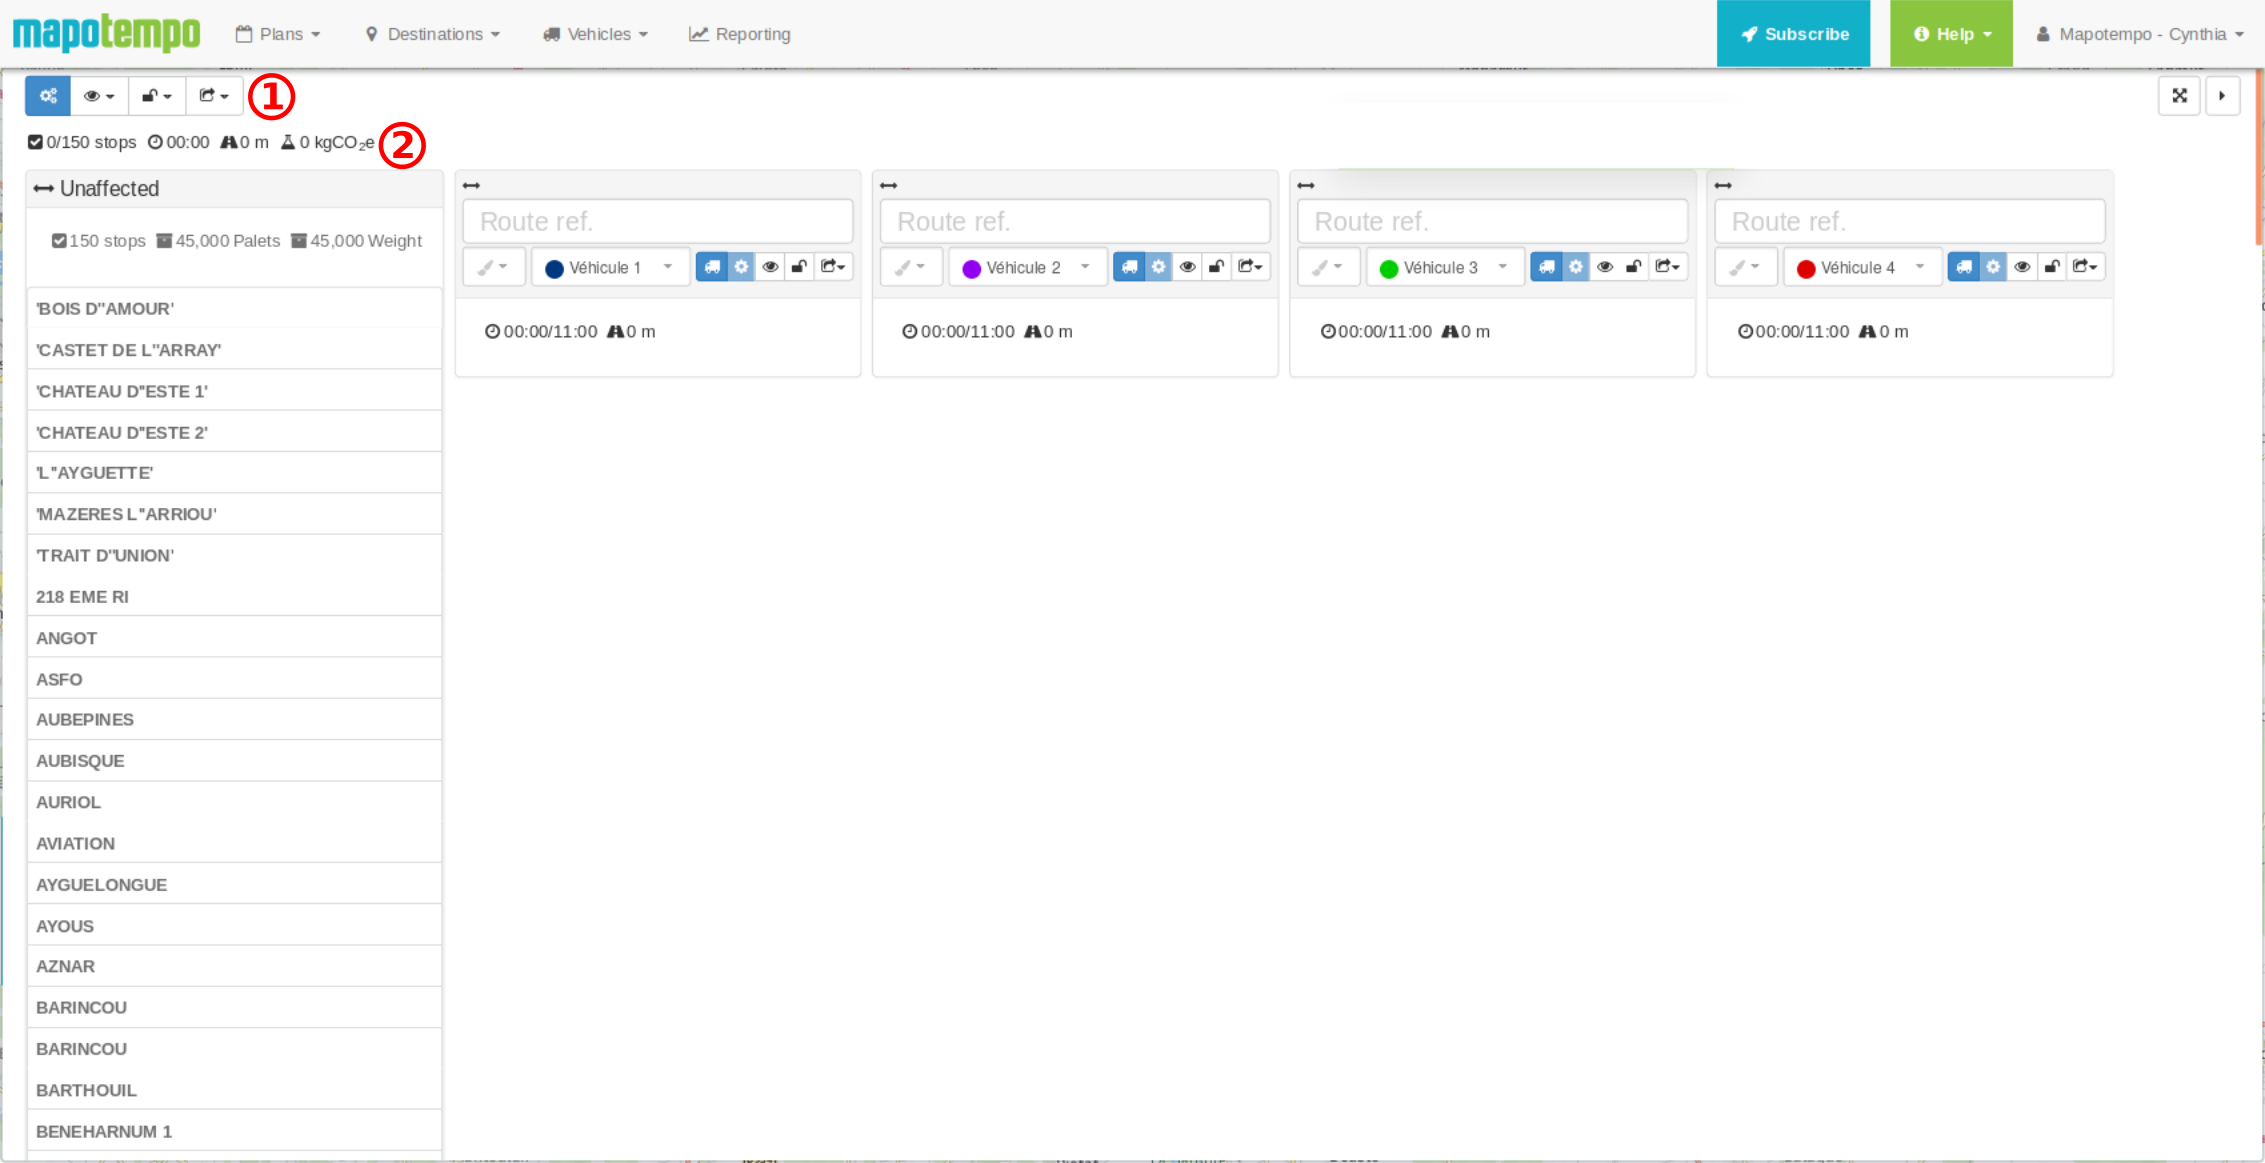
Fig. 1.181 Expanded view action buttons and global information
global optimization,
points viewing,
lock/unlock the routes,
routes export.
Next, information on all routes (number of stops, number of vehicles, route times etc.) (2)
In columns, from left to right, the list of unplanned stops, vehicles and stops assigned.
After optimization, stops are assigned to the vehicles. Fig. 1.182
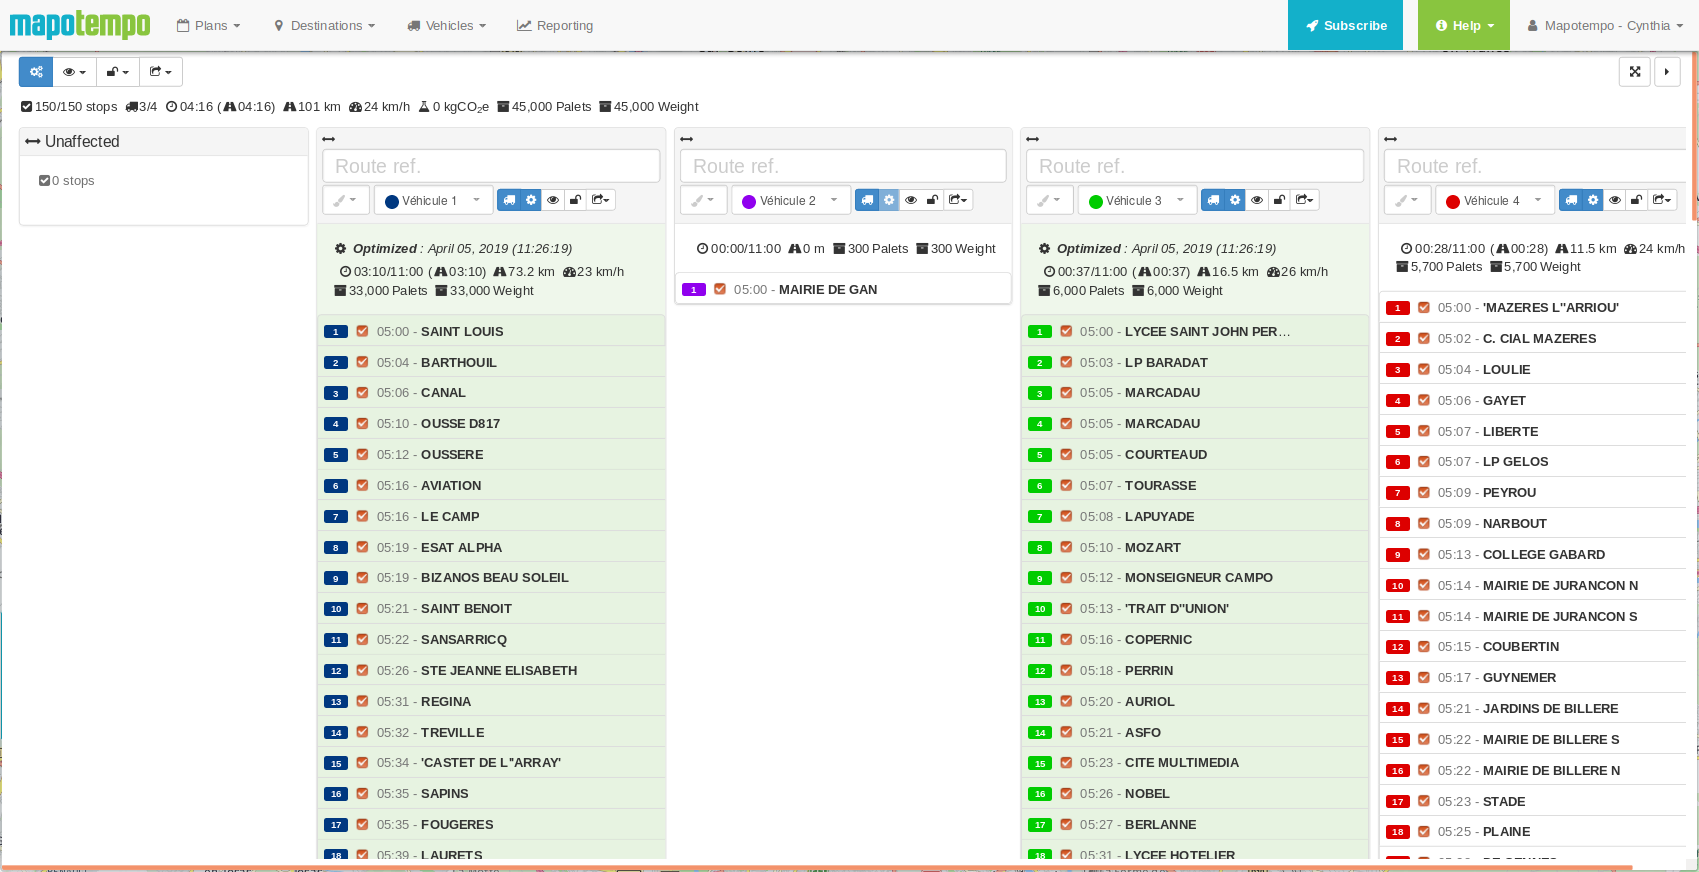
Fig. 1.182 Expanded view of an optimized plan.

Fig. 1.183 List of route plans for a vehicle
To view all routes for a single vehicle, select the plans where the vehicle is used by checking the plan box (1) in the list of plans.
In the drop-down menu (2), select the vehicle you wish to view.
Click on the “Show all routes for this vehicle” button. Fig. 1.184
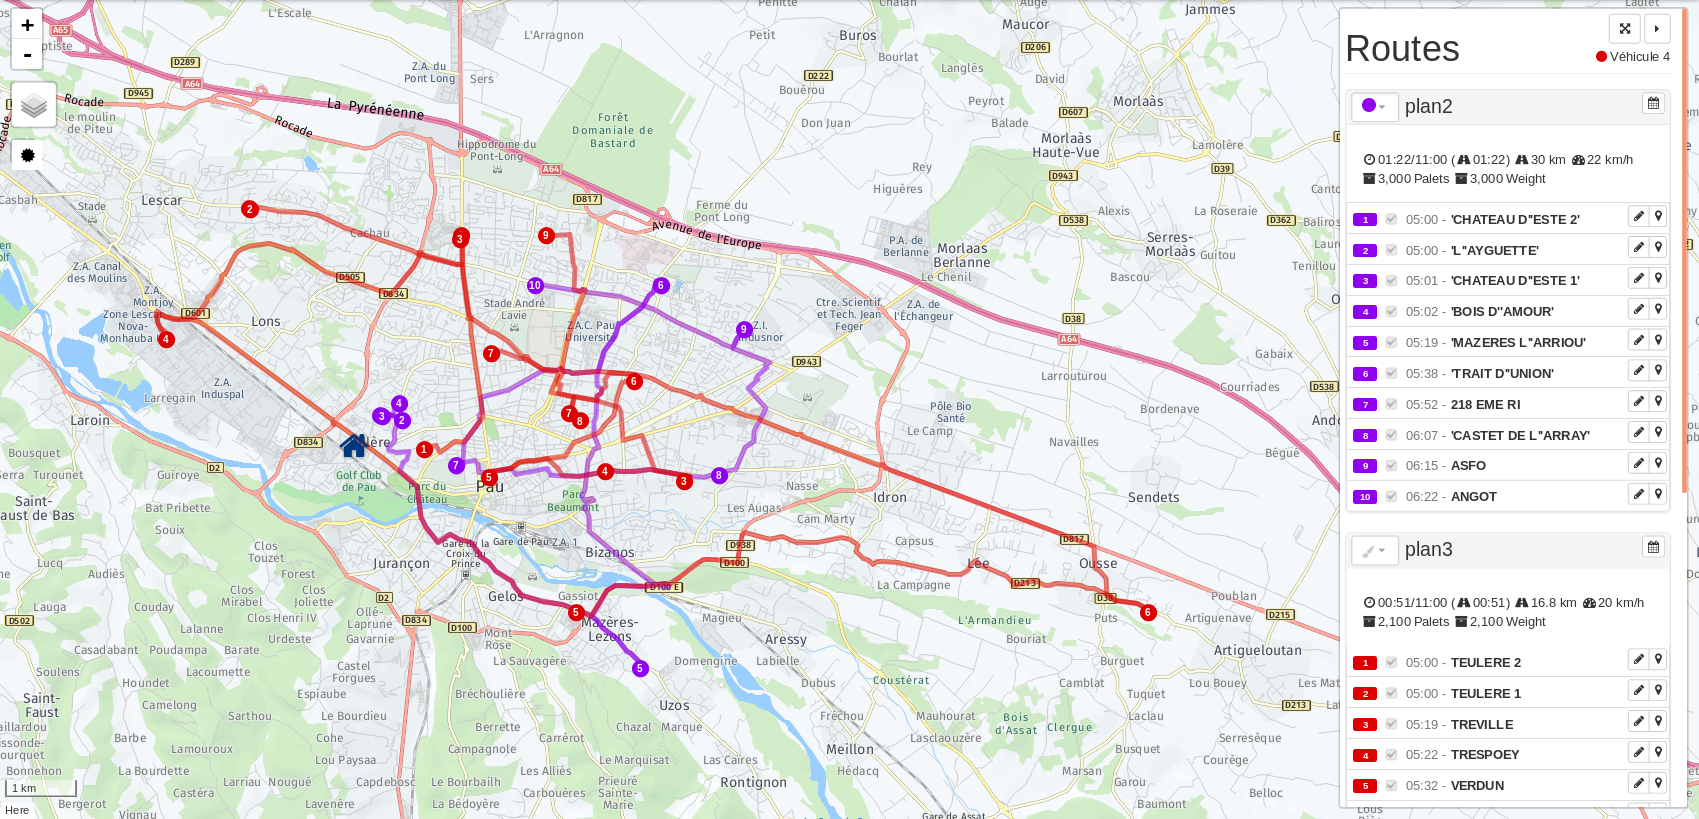
Fig. 1.184 Routes plan of a vehicle
The routes view is broken down into a map on the left and a dashboard on the right.
Note
To distinguish between the different routes, select a different color by clicking on the brush button to the left of the route name.

Fig. 1.185 List of plans for the load state of a vehicle
To view the load status for a vehicle, select the plans where the vehicle is used by checking the plan box (1) in the list of plans.
Dans le menu déroulant, sélectionner le véhicule à visualiser.
Click on the “Show all deliverables units for this vehicle” button. Fig. 1.186
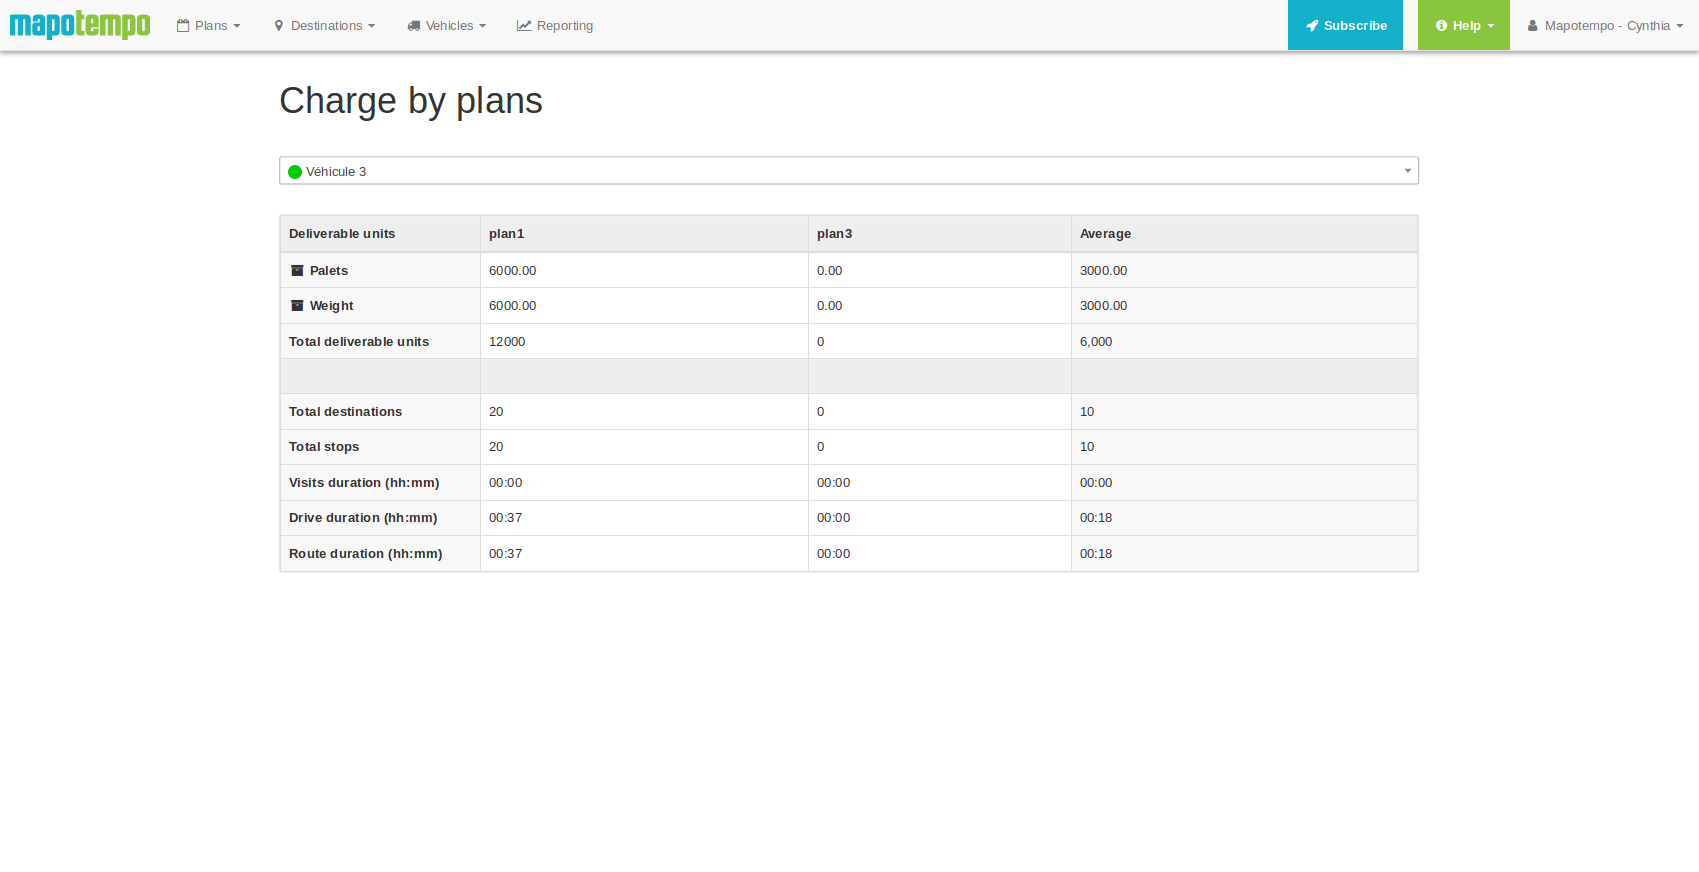
Fig. 1.186 Table showing the Vehicle’s deliverables
A table is displayed showing load data by route and a “Total” column. Deliverable units are listed row by row.
Want to add vehicles to your subscription, request a quote, subscribe to an option? Our sales team will answer you as soon as possible.
or Tel. +33 (0) 5 64 27 04 55
* From Monday to Friday 9 am - 5 pm (Paris time) without interruption
You have suggestions, you want to report a bug, ask for information? Our help desk team will answer you as soon as possible.
ou Tél. 05 64 27 05 83
* From Monday to Friday 9 am - 5 pm (Paris time) without interruption