Mapotempo Live is a mobile application which assists you in working out routes for deliveries, collections, sales representatives, couriers etc. It may be linked to Mapotempo Web, which includes the vehicle settings, addresses to visit and optimized routes. An API, Mapotempo Fleet, is available so that you can use Mapotempo Live with a proprietary interface.
An Android smartphone or tablet is linked to each vehicle. There is a route corresponding to each vehicle. The route is sent to the Android smartphone or tablet and thus becomes a list of missions.
Missions include configurable status which can be transmitted to Mapotempo Web to allow advanced mission monitoring. The Mapotempo Fleet API allows that feedback of information.
Mapotempo Web is designed for anyone whose business requires planning of more or less extensive routes with visits or stopovers occurring more or less regularly. Mapotempo allows anyone travelling by heavy goods vehicle, light vehicle, motorbike, cycle or on foot to travel their delivery, collection, visit or appointment routes in an optimal amount of time, while still abiding by business-specific constraints.
Mapotempo Live gathers the list of missions configured within routes. Mapotempo Live enables the forwarding of assignment information, such as the recipient’s telephone number so they can be called, or the sending of direct messages. On-board personnel/drivers/delivery personnel can thus communicate directly with the recipient at the simple click of a button. It sends back mission status updates as the mission unfolds. Those status updates can be configured and customized.
Mapotempo Live is available for public download. However, a subscription is required from the sales department.
Once you have contacted them, a login and password will be generated and sent to you.
Recommended Android version: 4.4 or later
You are recommended to use a Wi-Fi connection to download and when signing in the first time. After that, the Mapotempo Live will work with a mobile data or wi-fi connection, or offline.
Tap the Play Store logo  on the tablet or smartphone.
In the search window, type Mapotempo. The first search result will be Mapotempo Live. Fig. 2.2

Fig. 2.2 Play Store search results.
Tap the link. A page opens with the “Install” button  . Fig. 2.3

Fig. 2.3 Mapotempo Live installation screen.
Tap . The Mapotempo Live app is installed.
The email address and password are sent by email once users have signed up with Support. Fig. 2.4

Fig. 2.4 Email received after Mapotempo Live signup.
On a tablet or mobile phone, open the app.
From the Mapotempo Live installation screen Fig. 2.5 :

Fig. 2.5 Mapotempo Live installation screen.
From the apps screen Fig. 2.6:

Fig. 2.6 Apps screen.
Tap the Mapotempo Live logo  .
.
Enter the sign-in information sent by email (Email and password). Fig. 2.7

Fig. 2.7 Signing into Mapotempo Live
The app opens on routes “to do”, meaning a list of missions to complete. Fig. 2.8

If the route dates are earlier than the current date, Mapotempo Live suggests archiving them. Tap Yes to archive or No to keep the list of missions in “to do”. Fig. 2.9

If no route is shown on the app, the following screen will appear, saying “No missions available”. Fig. 2.10

On Mapotempo Web, in the Vehicle section:
Go to the sheet for the vehicle against which the user email is registered.
In the Mapotempo Live field, drop down the Define password for Mapotempo Live section.
Enter the password characters.
Save the vehicle by clicking on the Save button at the foot of the page.
The menu can be opened by tapping the menu icon  . Fig. 2.11

Fig. 2.11 Mapotempo Live Home.
The vehicle name and the email address linked to that vehicle appear in the menu header.
Routes to do are displayed in the order in which routes are to be completed. Fig. 2.12
Fig. 2.12 Routes to do list
To archive a route, swipe the chosen route from right to left. The archive button appears on the right. When you tap that button, the mission list is archived. Fig. 2.13

Fig. 2.13 List of missions to archive
Archived routes are displayed in the order in which routes are completed. Fig. 2.14

Fig. 2.14 Archived missions list
To dearchive a mission list, swipe the chosen mission list from right to left. The dearchive button appears. When you tap that button, the mission list is archived. Fig. 2.15

Fig. 2.15 Dearchived missions list
When a route is tapped, the mission list appears. Fig. 2.16

Fig. 2.16 Mission list.
A link to the map takes you to a map showing all the missions. You can zoom in or out. Fig. 2.17

Fig. 2.17 Map of all the missions.
To return to the home screen, tap your mobile device’s back arrow ![]() or the arrow at the top left of the “Map” title.
or the arrow at the top left of the “Map” title.
The activate/deactivate button ![]() is used to activate or deactivate the device’s location services. Fig. 2.18
is used to activate or deactivate the device’s location services. Fig. 2.18
Fig. 2.18 Tracking button.
When first used, you must allow the app to access the device’s location. Fig. 2.19

Fig. 2.19 Location service permission.
If it is activated ![]() , Mapotempo Live feeds back the smartphone or tablet’s location to Mapotempo Web.
, Mapotempo Live feeds back the smartphone or tablet’s location to Mapotempo Web.
The associated vehicle will then be visible on Mapotempo Web  .
.
Tap the Settings link to allow |autorizationdonnee| or block ![]() synchronization over mobile data networks. Fig. 2.20
synchronization over mobile data networks. Fig. 2.20

Fig. 2.20 Parameter link.
The mobile data setting enables you to allow synchronization over a mobile data network. Deactivating it prevents the app from synchronizing data except over a Wi-Fi connection. Fig. 2.21

Fig. 2.21 Parameter page.
To return to the home screen, tap your mobile device’s back arrow ![]() or the arrow at the top left of the “Map” title.
or the arrow at the top left of the “Map” title.
The Help link takes you to the online help platform: Fig. 2.21

Fig. 2.22 Help link.
To return to the home screen, tap your mobile device’s back arrow ![]() or the arrow at the top left of the “Map” title.
or the arrow at the top left of the “Map” title.
The Sign Out link is used to sign out of Mapotempo Live. Fig. 2.23

Fig. 2.23 Disconnect link.
You can sign a user out of Mapotempo Live. This allows one mobile device to be assigned to several users. Decide whether the smartphone is assigned to a vehicle or to a driver. To sign in another user, follow the Signing in to Mapotempo Live procedure
Routes are ranked by order of fulfilment. Each row displays the name of the route, the time and date of execution. Fig. 2.24
When you tap a route, the List of missions (to do or archived) is displayed.
The general menu can be accessed by tapping .
Each route in the to do list can be archived by swiping right to left. The “archive” icon ![]() appears on the right. The route is moved to the archives when you tap this icon.
appears on the right. The route is moved to the archives when you tap this icon.
Each route in the to do list can be archived by swiping right to left. The “dearchive” icon ![]() appears on the right. The route is restored to the “to do” list when you tap this icon.
appears on the right. The route is restored to the “to do” list when you tap this icon.
When you click on the information icon  , a window opens with a summary of all the information about the route. Fig. 2.25

Duration: Total duration of the route.
Distance: Total distance traveled on the route
Missions: Total number of missions to complete
Total quantities and units to deliver on the route.
Tags present on the route.
The mission logos and colors indicate the mission’s status. Each logo and each color can be configured according to your business and procedures. By default, they are defined as follows:
To do: Calendar on blue background  . The mission is listed and scheduled.
In progress: Arrow on yellow background  . The mission is part of the current round.
Completed: Tick on green background  . The mission has been completed.
Not completed: Cross on red background  . The mission could not be completed.
Each mission in the list is represented by an icon and a status color (1), a visit sequence number (2), a name (3), the address to visit (4), the time (5) and the date of visiting (6). When you tap one of the missions, the details screen for the mission you have tapped will open (see section on Detailed mission sheet). Fig. 2.26

Fig. 2.26 List of missions in portrait mode.
If the tablet or smartphone is in landscape mode, the list of missions occupies the left-hand area. The visit sequence number (1) appears in a gray circle, the name (2) appears in bold above the full address (3). The time and date (4) of the visit are shown to the right. Fig. 2.27
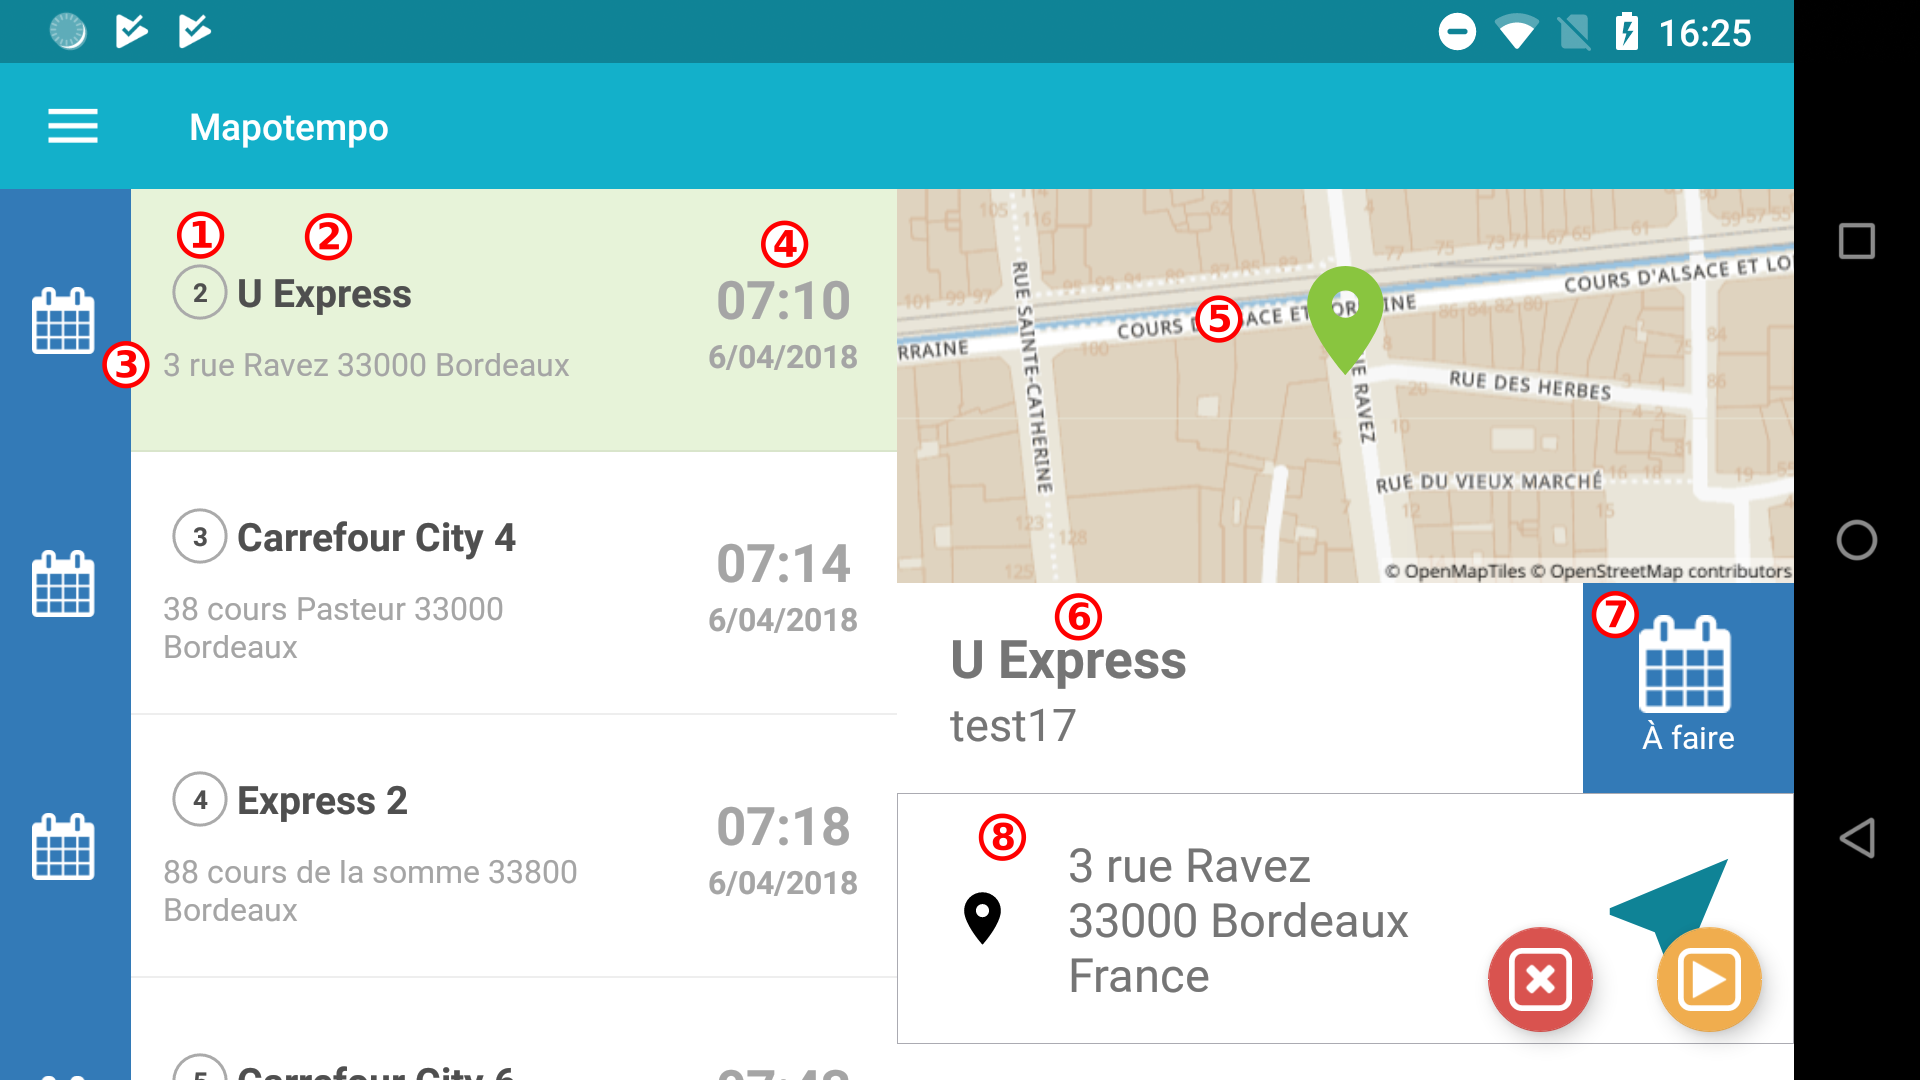
Fig. 2.27 Status change drop-down menu.
The detailed mission sheet occupies the right of the screen:
map with the mission location at the center. When you tap the map, it opens full screen.
mission name and reference
mission status button. When you tap it, a menu drops down with status change choices. These can be customized, upon request to Support, according to your needs and the specific nature of your business.
mission address including a link you can use to launch navigation with your chosen GPS app (Google Maps, Waze, Maps.me etc.)
Missions can be scrolled by swiping from right to left or from left to right. Display the next mission by swiping your finger to the left. Display the previous mission by swiping your finger to the right.
When you tap a mission in the list (on the left), the mission is displayed. Fig. 2.28

Fig. 2.28 Navigation in landscape mode.
When you tap a mission in the list, the detailed sheet opens. Fig. 2.29

Fig. 2.29 Detailed mission sheet.
Irrespective of the smartphone or tablet’s position (portrait or landscape), the back arrow ![]() (1), Mission title (2), Icônes d’actions mission (Mission action icons) (3) and mission menu
(1), Mission title (2), Icônes d’actions mission (Mission action icons) (3) and mission menu  (4) will be shown in a blue box. A map (5) shows the mission to visit at the center (6). The mission information is broken down as follows:
the name of the mission
the reference
the mission status button. When you tap it, a menu drops down with status change choices. These can be customized, upon request to Support, according to your needs and the specific nature of your business
the mission address including a link you can use to launch navigation with your chosen GPS app (Google Maps, Waze, Maps.me etc.)
the scheduled time, duration and date of the visit
the visit time window
the telephone number; tapping it will place a direct call or send a message
the Quantities to deliver or pick up
preuves de livraison (proofs of delivery): once items have been picked up and registered a green check mark appears alongside the validated proof
comments and optional fields: any relevant information concerning the mission
status floating buttons are used to change the mission status with one tap (see meaning of Mission logos and colors)
To return to the missions list, tap the mobile device’s back arrow ![]() or on the arrow at the top left of the “Map” title.
or on the arrow at the top left of the “Map” title.
This mini-map shows the mission at its center. When you tap it, the map opens full screen. Fig. 2.30

Fig. 2.30 Detailed sheet mini-map.
The mission name is in bold above the reference. Fig. 2.31

Fig. 2.31 mission name and reference.
The mission address includes a link you can use to launch navigation with a GPS app (Google Maps, Waze, Maps.me etc.), which you can select or may have preselected. A default GPS app can be selected and saved in your preferences.
The blue arrow to the right forwards you to the chosen GPS app.
Alongside the “Planned” heading, the visit time and date are shown.
The “Time windows” section shows the time window specified for the visit.
If provided for the visit customer, the telephone number is shown and can be tapped to make a call or send an SMS.
All the information provided for each mission can be found at the bottom of the mission sheet. Fig. 2.32

Fig. 2.32 Detailed mission sheet information.

Fig. 2.33 Mission quantities.
Tapping the quantities to deliver during the mission, a window opens.
This can be used to adjust the quantity with the plus or minus, or to change the quantity delivered by tapping directly on the field. The  button saves the quantity shown. The
  button removes any changes shown.

Fig. 2.34 Quantity window.
A search engine drops down at the top left if you click on the magnifying glass. You can use this to display only the quantities you want to see. If you click on the “All” checkbox, all quantities entered for this mission are displayed.
To view just part of the missions more easily, you can filter them by four criteria:
mission names (e.g. view all pharmacies to visit),
deliverable units,
mission tags,
mission status (see Logos and colors of mission)
Tap the filter icon at the top right of the mission list.
Filters can be applied simultaneously or individually:
Enter the text (or first characters) of mission names to filter.
Check the box(es) for deliverable units, tags or status.
The  indication is checked when the full list is not displayed. To access the full list, uncheck the filter indicator.
Missions in a filtered list can be opened and edited just like missions in a full list.
To return to the full list and remove filter settings, click the arrow  .
.
You can collect a signature, take a photo and/or write a comment as proof of delivery.
On his route, the user can amend, complete or adjust two pieces of mission information:
Adjust the Quantities,

Fig. 2.36 Detailed sheet mini-map.
On the detailed sheet, the mission status can be changed in two ways:
when you tap the status button, a drop-down menu opens with the different choices available,
floating buttons at the bottom right of the screen allow you to change the status to “to do”  , “in progress”
  , “completed”
  or “not completed”
  .
.
This list of status options is a guide only. Others may be possible. Upon request to Support they can be configured so that status options match the specifics of your business.
The status options shown by tapping the status button may vary according to the current mission status. There are four default status options. Fig. 2.37

To do: Calendar on blue background . The mission is listed and scheduled.
In progress: Arrow on yellow background . The mission is part of the current round.
Completed Tick on green background . The mission has been completed.
Not completed: Cross on red background . The mission could not be completed.
These tags can be configured upon request to Support.
The header of the details mission sheet includes photo  and signature
  logos, allowing you to take a photo and/or collect a signature.
When you tap the photo icon , the photo window opens. Fig. 2.38

Fig. 2.38 Photo window.
The smartphone or tablet’s camera app will open. Taking a photo. If appropriate, confirm the photo as valid. Otherwise, cancel. You can take a new photo.
If you are happy with the photo, tap the Save button  .
.
If you are unhappy with the photo, tap the Clear button  . Start again.
When you tap the signature icon , the signature window opens. Fig. 2.39

Fig. 2.39 Signature window.
The signatory’s name can be filled in. When you tap “Signatory name”, the smartphone or tablet keyboard appears. Fill in the signatory’s name.
Draw the signature in the “Sign here” box using a finger. If you are happy with the signature, tap the Save button .
If you are unhappy with the signature, tap the Clear button . Start again.
The signatory’s name can be entered in the field
At the top right of the screen the mission menu opens the option to “Survey the position” and “Edit the address”.
“Edit the address” allows you to complete or modify the address, and save it (2) at the top right. Fig. 2.40

Fig. 2.40 Edit address page.
Tapping the menu allows you to “Reset” the surveyed address. The added information is deleted. Fig. 2.41

Fig. 2.41 Delete surveyed address link.
To return to the mission sheet, tap your mobile device’s back arrow ![]() or the arrow at the top left of the “Map” title.
or the arrow at the top left of the “Map” title.

Fig. 2.42 Mission menu.
“Survey the position” opens a map centered on the position of the tablet or smartphone (cross). Reposition the cross to adjust the address, and save it (2) at the top right. The global position you have detected will define the address. Fig. 2.43

Fig. 2.43 “Survey position” map.
Tapping the menu allows you to “Delete the surveyed location”. The global positioning action will be ignored. Fig. 2.44

Fig. 2.44 Delete surveyed position link.
To return to the mission sheet, tap your mobile device’s back arrow ![]() or the arrow at the top left of the “Map” title.
or the arrow at the top left of the “Map” title.
Note
The smartphone or tablet must have an active NFC reader
NFC (Near Field Communication) technology uses an NFC tag and a reader contained in the smartphone or tablet. All kinds of information can be read by NFC. In this example, temperatures are being read with a Sopalog NFC tag.
If the SMS Sender box is checked, the name of the sender will be the name of the Mapotempo Web user who configured the SMS. The chosen name cannot exceed 11 characters. The change will become effective upon request to Support.
While you are on the route, move the phone over the NFC sensor to pick up the information you need. Fig. 2.45

Fig. 2.45 NFC reading in progress.
When the information has been read, the message “Success read tag xxxxxxxxx” is displayed in green. Fig. 2.46

Fig. 2.46 NFC read success.
When the information is not read correctly, the message “Error reading tag. Search in progress…” is displayed in red.
The information found is displayed at the bottom of the mission sheet. Click on it to display details about the information gathered, (here, the temperature graph). Fig. 2.47

Fig. 2.47 Temperature graph.
“Write a comment” allows you to add a few words to explain how the delivery, pickup or visit went. Fig. 2.48

Fig. 2.48 Comment window.
Enter the comment.
If you are happy with the comment, tap the Save button .
If you are unhappy with the comment, tap the Clear button . Write a new comment and Save .
At the top right of the screen the mission menu opens the option to “Survey the position” and “Edit the address”.
The menu for each mission allows you to fill in the form.
Multiple forms can be defined and exist side by side for a single mission.
Single page form
Section form
The types of field available in forms are: - text field: field in which you can write text. There is no limit on the number of characters. - checkboxes: list of predefined items that can be selected or deselected (multiple choices are possible). - radio buttons: list of predefined items. Only one item can be selected. - drop-down menu: list of predefined items that can be scrolled through (only one choice is possible). - rating: choose the number of stars to give a score.
In this example, the questions are fictitious. Fig. 2.49

Fig. 2.49 Link to the form
On the mission sheet, when you tap the Menu > Form link, the list of forms opens. Fig. 2.50

Fig. 2.50 Form list.
There are two ways of displaying forms:
list view: questions follow one another on a single page Fig. 2.51

Fig. 2.51 Single page form.
section view: questions are shown on separate pages Fig. 2.52

Fig. 2.52 Section form.
Tapping the menu allows you to “Reset” the surveyed address. The added information is deleted.
The available form fields are :
“Write a comment” allows you to add a few words to explain how the delivery, pickup or visit went.
checkboxes: list of predefined items that can be selected or deselected (multiple choices are possible).
If you are unhappy with the comment, tap the Clear button . Write a new comment and Save .
drop-down menu: list of predefined items that can be scrolled through (only one choice is possible).
rating: choose the number of stars to give a score.
Tapping the menu allows you to “Delete the surveyed location”. Your global positioning action will be ignored.
The page layout in sections must be clear for the user: all required questions in each section must be completed to validate the form.
When the form is filled in correctly, it changes to green in the list. Fig. 2.53

Fig. 2.53 Validated form.
Note
If you wish to create a custom form, please complete the questionnaire that follows. If necessary, please contact support by telephone (+33 (0)5 64 27 05 83) or by email (support@mapotempo.com).
The barcode or QR code scanner is opened: - via the mission sheet menu, by clicking on Scan bar code Fig. 2.54

via the quantity management window by clicking on the ![]() logo Fig. 2.55
logo Fig. 2.55

Position the phone or tablet camera facing the code you wish to scan. The application reads and records it.
By tapping the pencil icon  , you can add the barcode number by entering it directly on the mobile device’s keypad. Fig. 2.56

“Survey the position” opens a map centered on the position of the tablet or smartphone (cross). Reposition the cross to adjust the address, and save it (2) at the top right. The global position you have detected will define the address. Fig. 2.58
Fig. 2.58 “Survey position” map.
Tapping the menu allows you to “Delete the surveyed location”. Your global positioning action will be ignored. Fig. 2.59
Fig. 2.59 “Delete surveyed position” link.
To return to the home screen, tap your mobile device’s back arrow ![]() or the arrow at the top left of the “Map” title.
or the arrow at the top left of the “Map” title.
Fig. 2.60 Detailed sheet mini-map.
On the detailed sheet, change the mission status in one of two ways:
when you tap the status button, a drop-down menu opens with the different choices available
floating buttons at the bottom right of the screen allow you to change the status to “to do” , “in progress” , “completed” or “not completed” .
This list of status options is a guide only. Others may be possible. Ask Support to provide status options that match the specifics of your business.
Note
Data gathered on the route via the smartphone or tablet is presented in the report which can be downloaded from Mapotempo Web.
In Mapotempo Web, the global Mapotempo Live settings show:
Username: name of the Mapotempo Live user
API key: Mapotempo Live password
To prepare the transfer of a route from Mapotempo Web to Mapotempo Live, you need a vehicle to be assigned to that route, and that vehicle to be assigned to a Mapotempo Live user. The vehicle running on that route must have the correct user. Fig. 2.61

Fig. 2.61 Mapotempo Web vehicle tab.
In Mapotempo Web, click on the Vehicles tab. Select the vehicle you want. Fig. 2.62

Fig. 2.62 “Fleet user” fields.
Alongside the “Fleet user” field, there is a drop-down menu with all registered users. Select the user you want and save.
Note
Users is taken here to mean personnel on board, personnel in the vehicle, meaning the delivery driver, courier, driver, nurse, physiotherapist etc.
When the routes are ready for export, click on the export button  . Fig. 2.63

Fig. 2.63 Route export drop-down menu.
When you click on “Send to Mapotempo Live”, a window opens asking you to confirm you choice. Fig. 2.64

Fig. 2.64 Confirmation window.
To export routes, confirm your choice. The export begins. Fig. 2.65

Fig. 2.65 Route export to Mapotempo Live.
If you do not want to export the routes, cancel by clicking on “Cancel”: return to the routes page.
Mapotempo Live feeds back each mission status to Mapotempo Web Fig. 2.66

Fig. 2.66 Status list.
Thus each mission is accompanied by a colored square according to status:
Blue  : Scheduled
Yellow  : Started
Green  : Finished
Red  : Rejected
Grey  : Any status
You can activate stops according to their status.
Filters are available according to the status being fed back. By default, “Any status” does not appear on the list. Fig. 2.67

Fig. 2.67 Status filter.
For example, you can filter stops with “rejected” status. Only stops with a red label will then be active. By contrast, all stops with any other status will be deactivated. In other words, those stops are unchecked and not taken into account in the route.
Through this option it is therefore possible to modify the allocation of stops for each vehicle in real time and relaunch optimization. If vehicle A becomes available at the end of its route, it is possible to assign an unscheduled route to it from another vehicle B.

Fig. 2.68 Reporting dashboard.
Report date: clicking on the date field opens the calendar. The date can be selected.
The four summary maps of the day’s routes a. the total number of routes completed and the number of routes remaining b. the number of missions finished and remaining
Note
Departure and arrival stores count as missions in Mapotempo Live. A route includes 20 stops in Mapotempo Web. A departure store and arrival store are defined. The route includes 22 missions in Mapotempo Live.
number of missions completed late and number of scheduled missions running late
number of anomalies in missions and number of conforming missions
The three mission status pie charts a. status of route departures b. status of missions recorded during routes c. status of route arrivals
The table listing the day’s routes a. column showing actual delays and expected delays b. column showing the route name c. column showing the user to whom the route is sent d. status of route departures e. column summarizing the number of status records in routes f. column showing rest breaks g. column showing arrivals h. column showing route progress as a percentage i. link to the details on each route Columns where the header includes an upward and downward pointing arrow can be sorted by alphabetical (A to Z) or reverse alphabetical (Z to A) order.
When you click on a row in the table, details about the agent in the vehicle, material information and application parameters drop down.

Fig. 2.69 Live report view with route expanded.
To view details about a route, click on the button including the list icon ![]() .
.

Fig. 2.70 Live route mission report view.
Route details include:
The button to return you to the routes list
Information about the agent in the vehicle
Three maps summarizing a. the number of missions finished and remaining b. the number of actual and expected delays c. and the number of anomalies and conformities
The table listing each mission a. mission name b. mission status c. scheduled mission time d. mission arrival time labeled ETA if the time was recalculated on the route. If the arrival time is shown in red, the mission is more than 30 minutes behind schedule If the arrival time is shown in yellow, the mission is 15 to 30 minutes behind schedule. If the time is shown in green, the mission was on time. e. proofs of delivery gathered on the route: photo, comment, signature, barcode and address. Information gathered on the route is shown in blue in the report. When you click on one of the blue icons, a modal window opens showing the content of the information gathered.

Fig. 2.71 Examples of proofs of delivery.
To obtain a report of what happened on routes, go to the menu and click on the Reporting tab. Fig. 2.72

Fig. 2.72 Mapotempo Web menu.
The Reporting page contains a form comprising four fields: start and end dates, a “History of status checkbox” and the spreadsheet format selection drop-down menu. Fig. 2.73

Fig. 2.73 Download reporting form.
Select a date range. A calendar appears when you click on the Begin date and End date fields (2). Fig. 2.74

Fig. 2.74 Reporting calendar.
Click the dates you want.
The status history can be downloaded by clicking on the checkbox alongside “History of status”. Details about actions, changes in status, additional information (read positions and addresses) and proofs of delivery (photos, signatures and comments). Fig. 2.75

Fig. 2.75 History status button.
Two file formats are available: .xlsx for the Excel spreadsheet program and .csv for standard spreadsheets. When you click on one of the spreadsheet formats, the Report is downloaded to your computer’s Downloads folder. Fig. 2.76

Fig. 2.76 Mapotempo Web menu.
The reporting includes points visited, status change history, and links to information read on routes.
Note
The information contained in the downloaded report file is UTF-8 encoded and separated by commas.
Columns A to W are for information about all missions completed. The following columns present information gathered over the course of the route: mission status, quantities delivered or collected, photos, signatures, comments, GPS coordinates and addresses.
If you click on “Clear Mapotempo Live”, the data in Mapotempo Live will be cleared. Fig. 2.77
Fig. 2.77 Mapotempo Live Home.
If you click the button, you can “Clear Mapotempo Live mobile app”.
The button within the global route management buttons opens a window. Fig. 2.78

Fig. 2.78 Global route buttons.
This window lists routes present on the server (archived, in progress and to do). Check the box to the right of the route to select it. The “Clear Selection” button  is used to delete the mission list(s). Fig. 2.79

Fig. 2.79 Clearing all routes.
The “Export” button for each route opens a window listing all the routes for that vehicle. Fig. 2.80

Fig. 2.80 Clearing the routes for a vehicle.
Check the box to the right of the route to select it. The “Clear Selection” button is used to delete the selected vehicle’s route(s).
A workflow is determined by default in Mapotempo Live. It be customized to suit your own company terminology, your work steps and aspects specific to your organization. Fig. 2.81
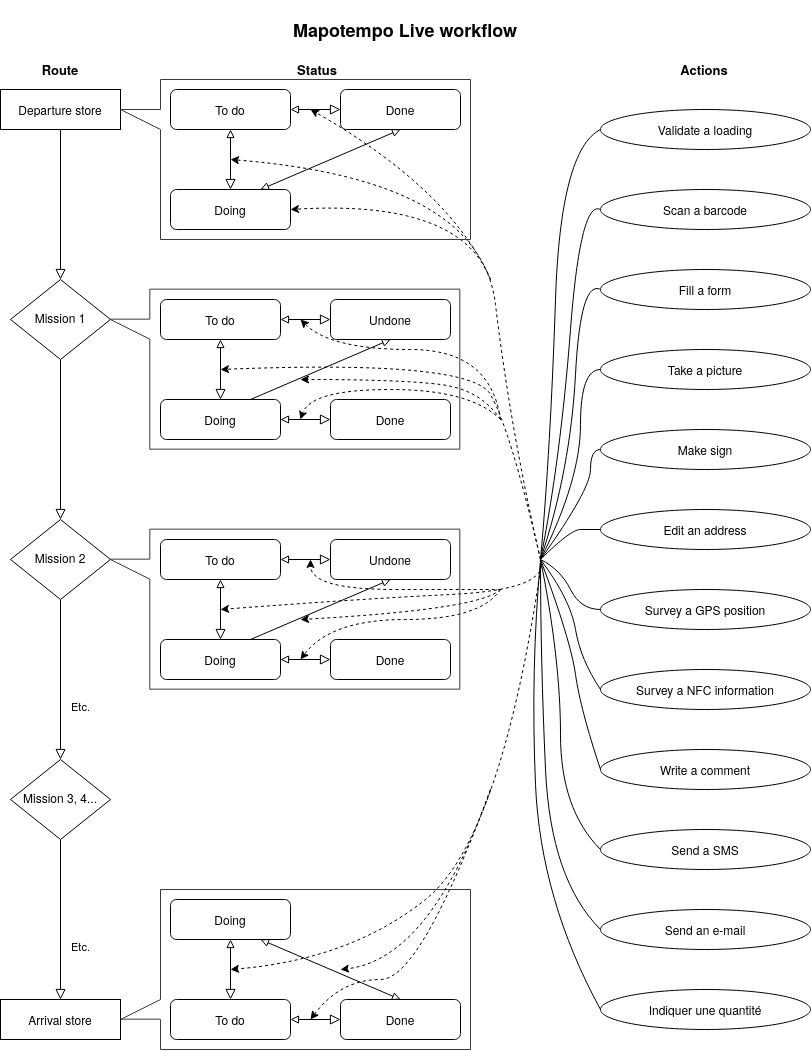
Fig. 2.81 Mapotempo Live Workflow.
Validate loading,
Scanning a barcode or QR code
Take a photo
Collect a signature
Write a comment
Send an SMS,
Send an e-mail,
Enter a quantity.
Status can be made adjustable on request.
Actions may be required for a change of status. These are prerequisites for steps in the workflow.
It is possible to change a mission automatically to another (without any user action).
Note
If you wish to create a custom workflow, please complete the questionnaire that follows. If necessary, please contact support by telephone (+33 (0)5 64 27 05 83) or by email (support@mapotempo.com).
At the top right of the screen the mission menu opens the option to “Survey the position” and “Edit the address”.
The menu for each mission allows you to fill in the form.
Multiple forms can be defined and exist side by side for a single mission.
Single page form
Section form
The types of field available in forms are: - text field: field in which you can write text. There is no limit on the number of characters. - checkboxes: list of predefined items that can be selected or deselected (multiple choices are possible). - radio buttons: list of predefined items. Only one item can be selected. - drop-down menu: list of predefined items that can be scrolled through (only one choice is possible). - rating: choose the number of stars to give a score.
In this example, the questions are fictitious. Fig. 2.82
Fig. 2.82 Link to the form
On the mission sheet, when you tap the Menu > Form link, the list of forms opens. Fig. 2.83
Fig. 2.83 Form list.
There are two ways of displaying forms:
list view: questions follow one another on a single page Fig. 2.84
Fig. 2.84 Single page form.
section view: questions are shown on separate pages Fig. 2.85
Fig. 2.85 Section form.
Tapping the menu allows you to “Reset” the surveyed address. The added information is deleted.
The available form fields are :
“Write a comment” allows you to add a few words to explain how the delivery, pickup or visit went.
checkboxes: list of predefined items that can be selected or deselected (multiple choices are possible).
If you are unhappy with the comment, tap the Clear button . Write a new comment and Save .
drop-down menu: list of predefined items that can be scrolled through (only one choice is possible).
rating: choose the number of stars to give a score.
Some questions may be required. The form cannot be validated without answers to those questions. They are marked with an asterisk on the form.
Note
If you wish to create a custom form, please complete the questionnaire that follows. If necessary, please contact support by telephone (+33 (0)5 64 27 05 83) or by email (support@mapotempo.com).
{NAME} to integrate mission name
{REF} to integrate the mission reference
{VISIT_REF} to integrate the visit reference
{DATE} to integrate the date
{TIME} to integrate time
{STEET} to integrate the address
{CITY} to integrate the city
{QUANTITIES} to integrate the quantity
{COMMENT} to integrate the comment
{VEHICLE_NAME} to integrate the vehicle name
You can configure sending SMS of more than 160 characters. To activate that, check the Long SMS box. In that case, SMS will be sent in full and billed at the cost of multiple SMS if the limit is exceeded. If “Long SMS” is not checked, SMS messages will be truncated if the limit is exceeded.
If you wish, the signature on SMS messages can be the general Mapotempo account name. Alternatively, you can specify the name of the signature you want to be displayed (11 unaccented alphanumeric characters).
An SMS is sent when the vehicle sets out. A second SMS is sent as the mission time approaches.
The SMS provider is Nexmo.
Sample SMS template: Hello {NAME}. You visit is scheduled for {DATE} between {TIME-30} and {TIME+30} in {CITY}.
Note
If you wish to create your custom SMS, please complete the questionnaire that follows. If necessary, please contact support by telephone (+33 (0)5 64 27 05 83) or by email (support@mapotempo.com).
a starting store, from “To do” to “Loading”
a mission, from “In progress” to “Canceled”
an end store, when changing to “Arrived”
Emails have no limit on the number of characters. And they can be sent either in plain text or in HTML format. They can also include attachments (photo, signature, answers from the form, temperature readings etc.).
An email is sent from the address robot@mapotempo.com to limit the risks of it being treated as spam. If an email needs to be sent with a specific sender’s address, please contact your IT department to assess feasibility.
An email can be copied (Cc) or blind copied (Bcc) to multiple recipients.
{COMPANY_NAME}: the name of your customer account in Mapotempo
{MISSION_NAME}: the name of the stop
{MISSION_REF}: your internal stop ID
{MISSION_ADDRESS}: address of the mission
{MISSION_PHONE}: phone number of the mission
{MISSION_DATE}: scheduled date
{MISSION_ETA}: estimated date, taking traffic into account
{MISSION_TIME_WINDOWS}: delivery time slots
{MISSION_DURATION}: duration of the mission visit
{MISSION_COMMENT}: comment before visiting
{MISSION_SURVEY_COMMENT}: comment entered on site
{MISSION_QUANTITIES}: scheduled quantities
{MISSION_SURVEY_QUANTITIES}: quantities actually entered on site
{DRIVER_PHONE}: driver’s phone number
Note
If you wish to create your custom email, please complete the questionnaire that follows. If necessary, please contact support by telephone (+33 (0)5 64 27 05 83) or by email (support@mapotempo.com).
The gear icon  at the bottom right of the sign-in page can be used to change from one server to another. Simply enter the server’s url in the field. To return to the mobile app server, click the “Reset” button.
Under construction
Under construction
Under construction
Under construction
Under construction
Under development
Preparation in progress
Want to add vehicles to your subscription, request a quote, subscribe to an option? Our sales team will answer you as soon as possible.
or Tel. +33 (0) 5 64 27 04 55
* From Monday to Friday 9 am - 5 pm (Paris time) without interruption
You have suggestions, you want to report a bug, ask for information? Our help desk team will answer you as soon as possible.
ou Tél. 05 64 27 05 83
* From Monday to Friday 9 am - 5 pm (Paris time) without interruption
