To create a new plan, click on the “Plans” menu. Then select “New”. :numref:`create_new_planning_men

Fig. 1.187 Create a new plan.
The following page appears Fig. 1.188:

Fig. 1.188 Create a plan.
Name(*): use this field to name the plan for your own convenience.
Vehicle configuration (*): (if multiple configurations enabled) select the desired configuration for your vehicle fleet. Drivers, vehicles, work schedules, rest periods may vary depending on the day or according to your activity. Each configuration allows you to define a general setting for a set of vehicles. The various parameters of the vehicle configuration are presented in the chapter on “Vehicle Management”.
Reference: provide a unique free text reference.
Date: fill in the scheduled date of the plan, in order to facilitate automatic exports to the mobile devices configured in your settings.
Tags: tags allow you to create a schedule with a specific subgroup of destinations. Activate the drop-down menu of the “tags” field; the set of existing tags appears. By default, no filter tag is chosen, so all your destinations are sent to the plan to be created. To filter destinations use tags; you can use two additional modes:
“ALL”: select “all” from the drop-down menu. Choose one or more filter tags; only destinations associated with all filter tags will be included in the plan. For example, if when creating your plan you choose to filter with the tags “A” and “B”, destinations associated with both “A” and “B” tags will be displayed in the plan. Customers with no tags, customers associated only with tag “A”, destinations associated only with tag “B” or destinations associated with other tags will be excluded. Fig. 1.189

Fig. 1.189 Selection of ALL the tags
“OR” : Select “or” from the drop-down menu. Choose one or more filter tags. Only customers with at least one of the chosen tags will be proposed in the plan. For example, with tags “A” and “B” chosen as filters, only destinations with only tag “A”, or only tag “B”, or with both tags will be used in the plan. Fig. 1.190

Fig. 1.190 Selection of one OR several tag(s)
Zoning: if you have already created one or more zonings, you can select it/them from the drop-down list (description in the chapter on “Zoning management”). If a zoning is still to be created, you can associate it with your plan later. This field is optional for creating your plan.
Create Plan: click the “Create Plan” button to validate the entry.
Once the entry has been validated, the interactive map is displayed with all the geocoded clients, giving you the possibility to reorder and optimize your routes (details in “Optimizing routes” chapter).
From the Plan page, there are four ways of assigning a stop to a vehicle or route, whether assigned or unplanned.
When you click on the lightbulb  , the stop is automatically assigned within a route.
When you move over a stop, the  icon appears. It indicates that you can move this point by holding down the mouse button. Drag to the chosen vehicle/route. Release the mouse button.
When you click on the truck icon  , a drop-down menu appears showing active vehicles. When you move the cursor over one of the destinations, the stop is assigned to the vehicle.
When you hover over or click on a stop on the plan, a contextual window opens. Fig. 1.179

Fig. 1.191 Window for a stop on the map

Fig. 1.192 Drop down the vehicles list.
Assign this point to another vehicle Fig. 1.180
Check/Uncheck the stop to plan or unplan it.
Go to the destination page for the stop  .
.
Generate an isochrone or isodistance zoning from the point  . The drop-down menu offers to draw an isodistance zoning (zoning around a point where the distance is constant) or isochrone zoning (zoning around a point where the journey time is constant).
A line separates off the next section. The position in the route order, destination name and precise address are shown in that section.
A final section, separated by a line, presents delivery information: quantity, scheduled time, ETA, visit duration etc.
When you click on the  button in the Unplanned section, the drop-down menu offers to “Move stops”.
This same button opens a drop-down menu at the end of which you have the option to move stops.
A window opens. Fig. 1.193

Fig. 1.193 Window for simultaneous destination movement
Select the points to move by checking the box to the left of the point names. Fig. 1.194

Fig. 1.194 Drop-down menu to assign the destination to a vehicle
Select the destination route or to unplan the points by dropping down the “Select the destination route” menu. Fig. 1.195
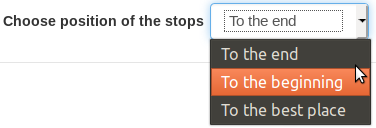
Fig. 1.195 Drop-down menu to move a destination to a position in the route
You can determine where points are moved to by selecting the position of stops in the corresponding drop-down menu.
A number of additional features are provided for greater ease of use.
Want to add vehicles to your subscription, request a quote, subscribe to an option? Our sales team will answer you as soon as possible.
or Tel. +33 (0) 5 64 27 04 55
* From Monday to Friday 9 am - 5 pm (Paris time) without interruption
You have suggestions, you want to report a bug, ask for information? Our help desk team will answer you as soon as possible.
ou Tél. 05 64 27 05 83
* From Monday to Friday 9 am - 5 pm (Paris time) without interruption